Tag Archives: diy

Pumpkins Decorated with Etchings

I love Halloween and I love to carve pumpkins!  Mid-September I start picking up pumpkins for fall  decorations around my home.  Because carved pumpkins will only last a short time, I  wait to carve them until a few days before  Halloween.

This year I am trying something new!  I am etching my pumpkins with a design and leaving them whole – at least for the time being!  I have etched pumpkins before, but then my process was to “gut” the pumpkin, thin the wall, and light a candle inside to see the etching glow!  It is very cool.

This year I am doing my etchings early, leaving the pumpkins whole and later I can “gut” them if I wish.


Pumpkin Carving Tools

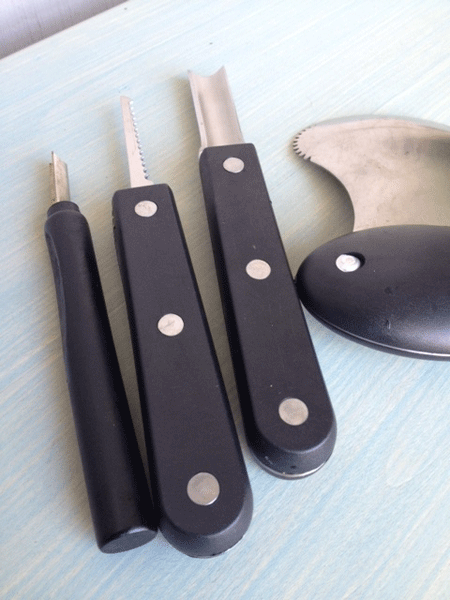
The tools I used for this project were purchased from Williams Sonoma.  They are excellent quality and should last for years!  Currently, they have a similar product – the  Pumpkin Carving Tools 3-piece Set.  Included in this set is an etching tool, which is what I used here.  The etching tool is also called a linoleum cutter and if you happen to have wood carving tools, they may work as well.  For whatever tool you use, the goal is to remove the top layer of skin from the pumpkin!

Pumpkin with Vine Drawing

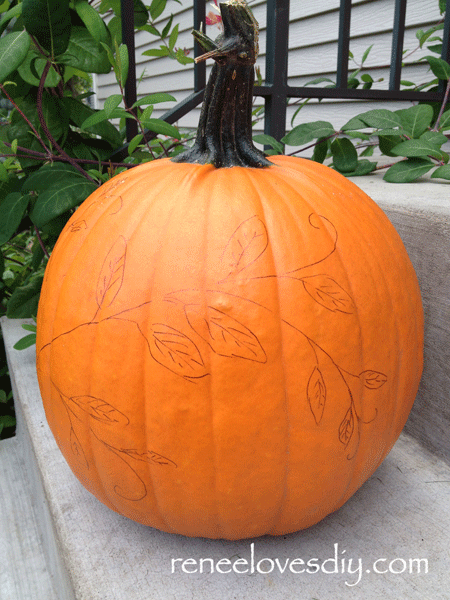
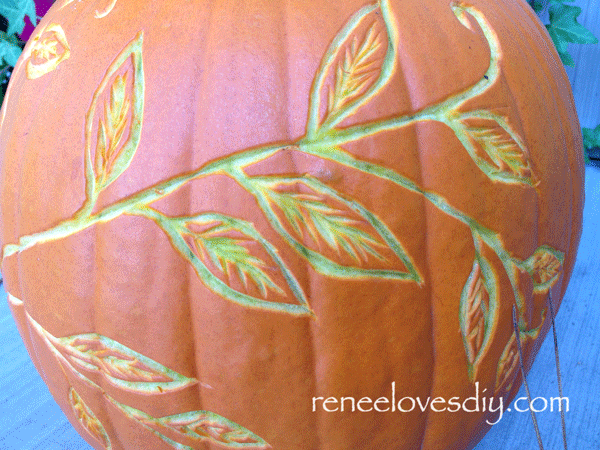
Before I began the etching process, I  drew an image on my pumpkin.  Here I show a roughly drawn simple vine.  It was not necessary for it to be perfect since it is just a guideline.

Etching a Vine on a Pumpkin

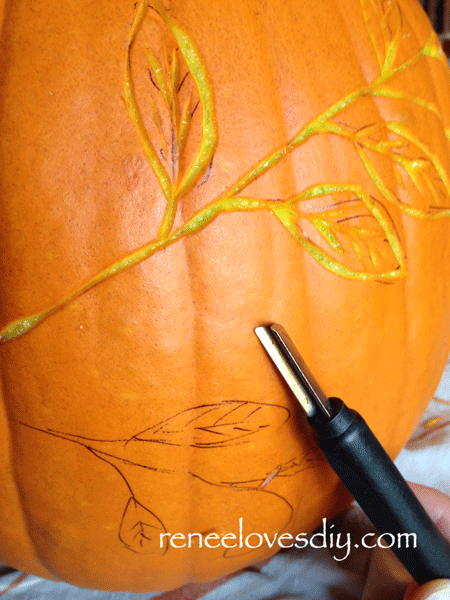
Then, using my etching tool, I carved  out the vine.

Etching a Vine on a Pumpkin

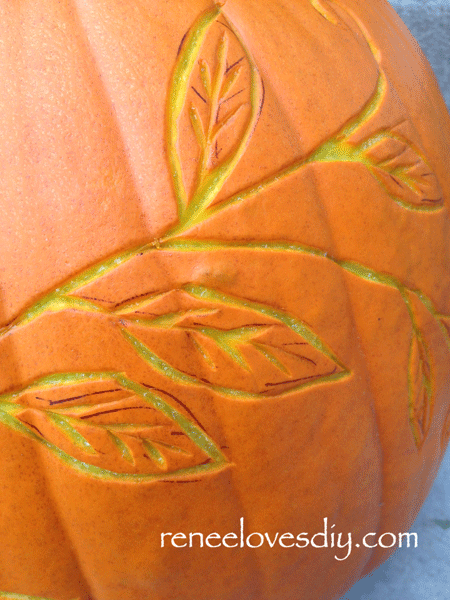
When I finished etching, I used a Magic Eraser to remove any visible ink.  The Magic Erasers are a fabulous product so if you have never tried them – you must test  them out for yourself!

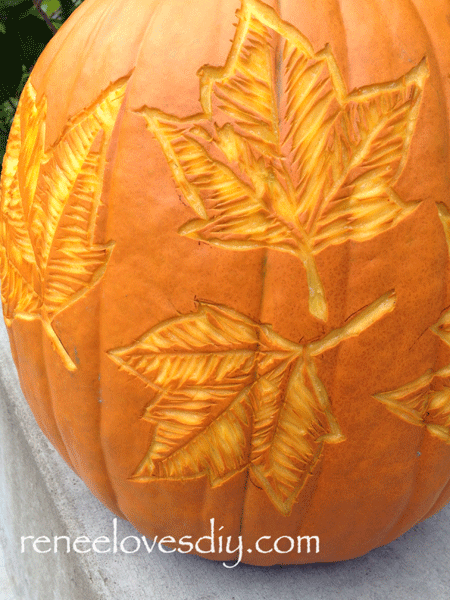
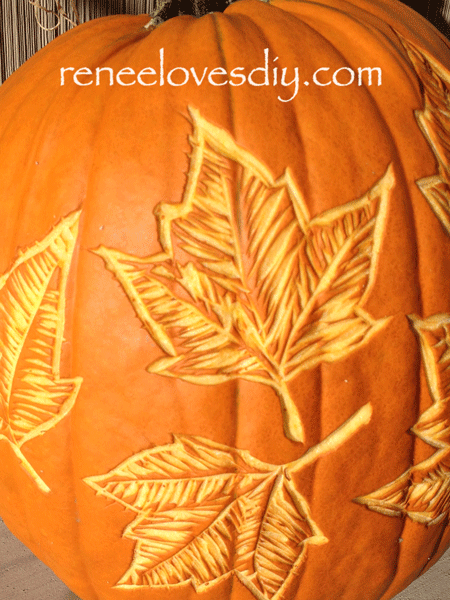
My next pumpkin I etched with maple leaves.  I went to my backyard, picked a couple of different sized leaves and roughly traced them onto my pumpkin.

Preparing Pumpkin for Leaf Etching

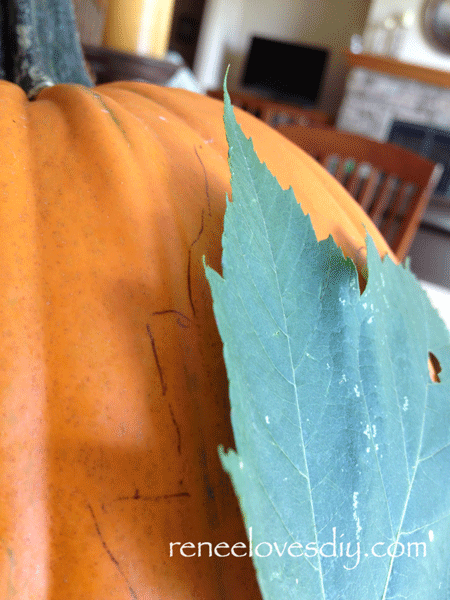
I etched out the edge of the leaves then added the veining detail.  If you are not sure how to add the veining, just examine the leaf in front of you.  Of course, I had to simplify the detail – I am not as good as  mother nature!

Pumpkin with Leaf Etching

If you are unsure how to lay out a vine or leaves to make them look natural, just google drawings of the images you want to replicate and you will get wonderful guidance from the many fabulous artist whose images are on the web!

Pumpkin with Vine Etching
Pumpkin with Leaf Etching

Have a Happy Fall!

I linked up at I Heart Nap Time!


Marzipan Cupcake Garnish – Beautiful & Delicious!

Marzipan garnish decorating a cupcake!

Here is another wonderful cupcake garnish!  The flowers you see here are made from marzipan and are not only beautiful, but very tasty too!

Marzipan is made of finely ground almonds mixed with sugar to create a paste that can be molded into cake icing, wonderful candies, and cupcake garnishes!  It is very delicious and can be found in any baking aisle!

Still not sure what marzipan is?  Well, If you have ever been in a candy store, you have seen marzipan.  The beautiful miniature fruit candies found in the display case are made from marzipan that has been colored and molded into beautiful shapes, such as apples, oranges, or bananas by a skilled candy maker. Next time you see them, try one.  They are very tasty!

Creating this garnish was very easy.  Here is the short list of what is required.

Fondant Cutters – mine are from Wilton and I found them at Michaels for less than $4.
Marzipan – this comes in small cans or tubes in any baking aisle.
Gel Food Colors – these now come in the multipack – love it!


Coloring the marzipan!

To color the marzipan:  Break off the amount you think you will need;  microwave for just a few seconds  to warm it slightly; add a couple of drops of food coloring; knead the marzipan to incorporate the color.  You may need to add a little water if it seems dry, a little powdered sugar if it seems too moist.

marz2

Rolling out the marzipan:  Cover your surface with a light coating of powdered sugar; roll the marzipan to a thickness of about 1/4″.  Using trial and error, decide what thickness works for your project.

marz3

Cutting the flowers:  Using your fondant cutters, cut out the flowers for your decorations. The tricky part to this, is removing the flower from the cutter.  Because the flowers are delicate, you will need to use toothpicks or bamboo sticks to remove them from the cutter.  I used both the sharp and blunt ends of the picks to accomplish this.

marz4 marz5

The cupcakes you see here were for a wedding shower and because I needed to garnish 40 cupcakes, I made the flowers a couple of days before the event.  I stored them on wax paper in an airtight container.  The multi-colored flowers I stacked before storing them because the marzipan will dry some and it will be more difficult to get the pieces to stick together if they dry too much.  You can always use a little corn syrup “glue” when stacking flowers.  Not too much though or they will slide apart!

marz6 marz13

I used Marzipan to decorate my Gluten-free Chocolate Ganache Cake from a previous post!  Delicious and beautiful – gotta love it!

Gluten-free Chocolate Cake

Tulips


Last fall, I purchased a bag of white tulips on clearance with the plan of forcing them in a pot. I tossed the bag in my garage, so they could experience 12+ weeks of cold!

Tulips need to experience winter weather in order for them to bloom and this year that was not a problem – many, many, many weeks of cold winter weather!

Patiently, I waited until March when small signs of springs were emerging to plant my bulbs in a pot.

Following the directions on the package, I knew my particular tulips needed to be planted 6 inches deep. I half filled my clay pot with potting soil and tucked all 14-tulip bulbs into the soil – bud end up, rounded end down – it matters! I then buried the bulbs, watered my pot well and placed it back in the garage.

Two weeks later I checked my pot and voila – tulips were popping out.
I moved the pot outside on my porch and continued to wait…

Waiting for tulips!

And wait…

Beautiful

Beautiful!
I’m doing this again next year!

Chocolate Garnish for Special Occasion Cupcakes

Chocolate Cupcakes
Chocolate Cupcakes

It’s the season for prom and what dessert could be better than cupcakes? To me, the best part of eating a cupcake is – No sharing required!

It’s the one time when eating the whole cake by yourself is completely acceptable!

The recipe I prepared was Ganache-Filled Chocolate Cupcakes with Seven-Minute Meringe Frosting because it is my son’s favorite. It was his prom after all, so I guess he deserved some say!

This recipe is fabulous and produces a deep rich chocolate cake filled with a creamy ganache and piled high with light as air, velvety, meringue frosting.

Wish they were bigger – no worries – just have two, three….

Filling cupcakes with ganache.

Because the cupcake’s frosting was white, I wanted to embellish it with a chocolate garnish. I struggled over what to create until my daughter suggested making bow ties and dresses. Brilliant! I immediately set out to do just that!

Chocolate Garnish
Chocolate Garnish

I began by drawing an outline of ties and a dress in the sizes I wanted the garnish to be. I then placed a piece of translucent wax paper over the drawings and the pencil lines were clearly visible. After filling my pastry bag with melted chocolate, I piped the chocolate onto the sheet of wax paper using a small round decorator tip. I simply needed to follow the lines and voila – a super easy and very fun garnish.

Chocolate Garnish for Cupcakes

Once the chocolate hardened, I eased them from the wax paper and gently pressed them into the frosting. So fun!

This easy garnish would work well for any formal occasion especially weddings, engagement parties, wedding showers, anniversaries, prom…..