Tag Archives: party

Festive & Fun Table Decorating Ideas!

It is the time for parties   –  Graduations, Memorial Day, Independence Day, Weddings…  If you need an inexpensive and simple decoration for your tables, I have you covered!

Now go get your decorative paper because I have not one, not two, but three ideas for you!

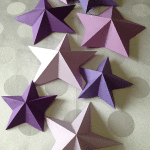
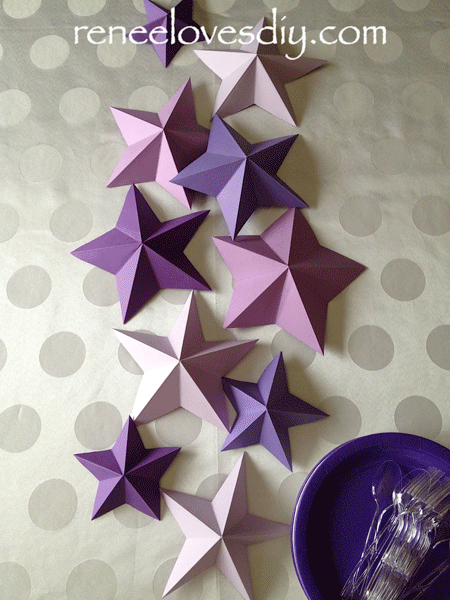
First up – Paper Stars

The sky is the limit with this one!

Just toss the stars in the center of your table for a festive center piece or run them all along the table for a table runner.  So easy and so fun!

Paper Stars
Paper Stars

What do you need?
Craft Paper & Scissors

The stars shown here were crafted from card stock because I wanted a star that was a little heftier and hopefully wouldn’t blow away.  Card stock is more difficult to fold than paper, but it suited my needs perfectly!

For a tutorial on how to cut a star using a single cut, refer to this youtube video:  Simple 3D Paper Stars

As you will see in the video, cutting stars is very easy to do.  I did have to watch the video a couple of times, but after that  – I had it!

To create the look I wanted, I used various colors and sizes.

This would be a great decoration for Memorial Day or the 4th of July with stars made from red, white & blue paper!

Paper Stars
Paper Stars

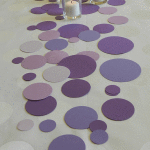
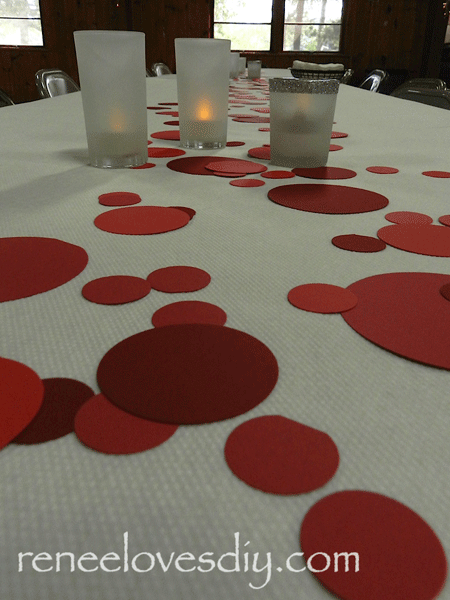
Next up – Extra-large Confetti

This is one of my favorite table decorations!  Last year,  I suggested using this for a cross-country banquet with great success.  I gathered a group of volunteers at my home, served them wine and snacks and we punched and punched and punched….

All that punching resulted in easily decorated tables that looked adorable and lots of fun for me chatting, punching and drinking wine with the ladies!

What do you need?
Cardstock
Circle punches
(I used 1″, 2″ & 3″ punches!)

Extra-large Confetti

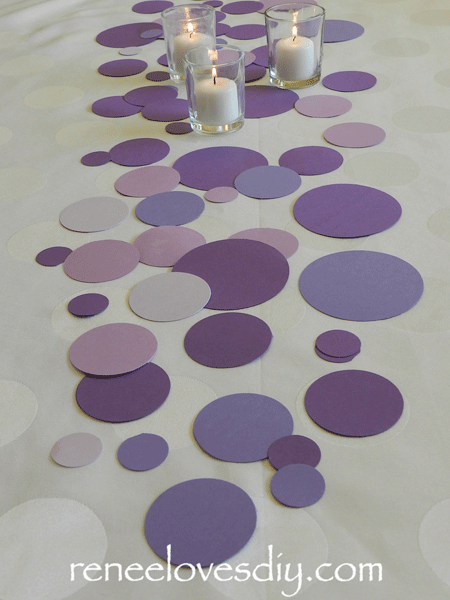
After gathering your confetti, arrange them on your table.

You can choose to separate the circles like below.

Extra-large Confetti

Or toss the confetti on the tables and let them fall where they may!
Either way creates an adorable table decoration!

Extra Large Confetti


Last paper table decoration for today!

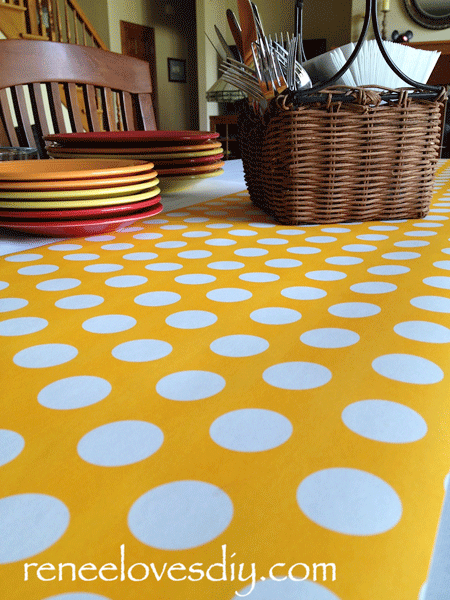
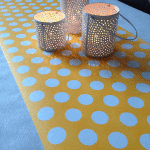
Paper Table Runners!

Wrapping Paper Table Runner

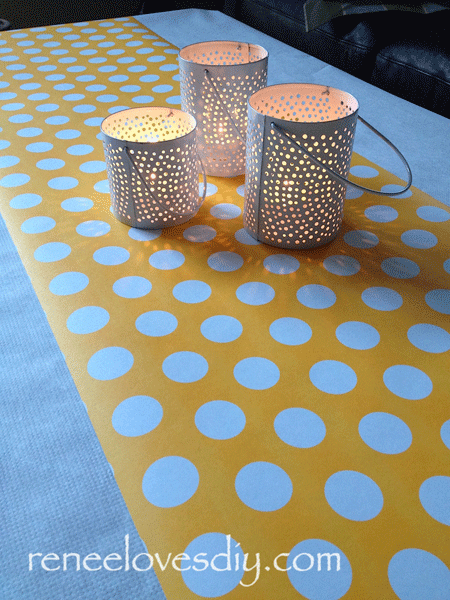
To make these fabulous table runners, I used wrapping paper!

Traditionally, table runners are 12-16 inches in width and most wrapping paper comes in widths of  24″- 30″.  If you want a wide table runner, go ahead and use it as is.  If not, be sure to buy the paper with a grid pattern on the back so you can easily and neatly cut it the correct width.

Wrapping Paper
Wrapping Paper

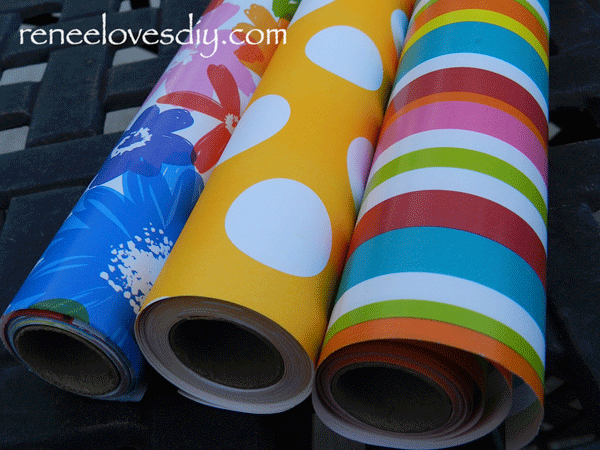
Another option that makes life easy is to purchase short rolls of wrapping paper. Michael’s sells 7 yds of 17″ wide wrapping paper for $1.50.  The selection of the wrapping paper is limited, but give it a try.  For very little money you can create great looking tables!

Wrapping Paper Table Runner

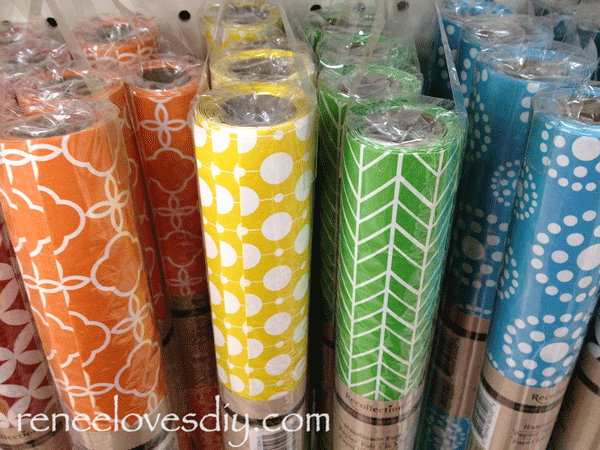
Another product at Michael’s that I am really excited about is their line of craft paper.  It comes in rolls of 20′ that are 14″ wide – Perfect!

The paper is a wonderful weight and comes in so many fabulous colors!

Here are just a few!

Wrapping paper
Wrapping Paper at Michaels!

Now there is no reason why you shouldn’t have beautifully decorated tables for your next celebration.  Whether it is for a graduation, birthday, anniversary or just a simple family gathering, every party will be festive and fun with a simple paper table decoration!

Wrapping paper table runner
I linked up to iheartnaptime!

Hot Chocolate Bar


Hot Chocolate Bar
Hot Chocolate Bar

As adults, we plan fabulous parties thinking of everything an adult might enjoy.  We tend to overlook the fact that kids will be present at our gathering and may not enjoy the same things! This year, when planning your holiday party, create a special treat just for the kids!

So kids – this is for you!

Candy for a Hot Chocolate Bar

Hot Chocolate Bar

Set up an area where the kids can choose treats to stir into their mugs of hot chocolate. Bowls heaping with cut-up peanut butter cups, peppermint patties and marshmallows will be a welcome sight for the wee ones. Include candy canes and chocolate spoons for stirring their personalized drink!
And don’t  forget the whipped cream – Must have whipped cream!

Cinnamon – that’s another great addition.  Sprinkle some of that on the whipped cream – so beautiful!

Hot Chocolate Bar
Hot Chocolate Bar

Just in case there is an adult or two that enjoys a nice mug of hot chocolate, have a few mini-bottles of assorted liquors for them to add to their mugs! There we go – thinking about the adults again!

Liquor Bottles for the Hot Chocolate Bar

How to make Chocolate Spoons!

This recipe will make 8 Chocolate Spoons
Heat 1/2 cup semi-sweet chocolate chips and 1/2 tsp  coconut oil in a double boiler over barely simmering water.  Allow the chips to melt and then stir until smooth.

Chocolate Spoons
Chocolate Spoons

Using plastic or wooden spoons ( I couldn’t find them, but I know they exist!)
Coat them well and make sure the bowl of the spoon is full of chocolate!
Set on wax paper to cool

Chocolate Spoons
Chocolate Spoons

Heat 2 oz of cut-up caramels and 1/2 tbs of cream in a double boiler over barely simmering water.
Allow the caramels to soften then stir until smooth.  Drizzle the melted caramel over the top of the chocolate spoons.  If the caramel isn’t drizzling well, thin with a little water!

Chocolate Spoons Drizzled with Caramel

The caramel sticks to everything therefore, I would avoid getting it on the bottom of the spoon!  The kids won’t be able to pick them up!

Also, I use a small glass bowl over a small pot of simmering water.  A regular double boiler is way to big for this tiny amount of caramel!

I linked up to iheartnaptime!

Wine Tasting Party

Get out the stemware - it's time for a wine party!
Get out the stemware – it’s time for a wine party!

I love wine and I love parties – put the two together and I am a happy lady!

Anyone who knows me, knows I love to have parties.  I love decorating, selecting the wine and preparing the food, but mostly I love when my guests have a wonderful time!  I like to see smiles on faces, booming laughter and my guests getting to know my wonderful family and friends they didn’t know before.  I am a people person – it’s as simple as that!

Because my husband and I both enjoy wine and sharing it with others, we have wine “tasting” parties at least once a year.  We go beyond traditional tasting and create a fun, non-intimidating wine challenge for all to participate in – and guess what – they all do and they all love it!

Hide the labels and number the bottles.

Preparing the wine challenge – Select 3-4 bottles of wine.  I would select  wine of one color!  Picking the chardonnay out of a line up with a pinot, cabernet sauvignon & merlot, might be a tad bit too easy for most of us!

Because we have done this challenge quite a few times, a few of our guests like to get in on the game ahead of time and provide their own special wine for the challenge.  Last time, we had a wonderful Argentinian Malbec from my neighbor.  It was a wine that was new to us and we welcomed the addition to the game!

Wine Challenge
Wine Challenge

Selecting your wines ahead of time is helpful to give you time to make the challenge sheets!  I get on the computer and search for information about the wine.  On the challenge sheets, I provide the name of the wine, the type of grape used, and a description of the nuances of the wine.  Is it full bodied, earthy, jammy, does it have a hint of plum, cherry, or vanilla…Did the wine receive a high score from the wine advocate, wine spectator,  Robert Parker…

Whatever I find, I summarize and type it on the card.  If I can find a picture of the label – wonderful – I include that as well!

Wine Challenge
Wine Challenge

Each bottle I cover with a wine paper bag and assign it a number.  My guest’s job is to determine which wine correlates with the wine descriptions I have provided for them on their challenge card!

Above are examples of three of our wine challenges – bottom line – the picture just makes it better!

Gather the Stemware!

As my guests arrive I offer each of them a glass of wine and when most guests are present the challenge begins!  The problem is how do you taste a wine when everyone already has wine in their glass – wine is not for gulping down!  This is not beer!

Luckily, my husband had a great solution.  We used our aperitif glasses for the wine challenge.  For some reason, we have two dozen of these.  We rarely have aperitifs, but we do have the glasses – that’s what’s important – right?

Now I know – it you are a true wine snob, you know this isn’t ideal.  The wine has limited space to be swirled and the aromas may not hit your nose properly, but sometimes you gotta work with what you have.

The aperitif glasses really did work very well for keeping track of glasses.  Each guest had their wine glass and their tasting glass and each was clearly distinguishable!  It was one of those rare times that – yes – my husband was right!

The only thing left to do is have fun, celebrate your friends and enjoy your wine!

Ok- maybe not so fast – you need to create your guest list, make invitations, put together a menu, think about decorations, go shopping…

Party in a Box Gift

Party in a box gift
Party in a box gift

Graduation Party Box Gift

When just a gift is not enough!

Years ago a niece was graduating from high school and I felt bad that we were unable to attend her celebration.  Wanting to do something special for her; to send her more than just a gift; I came up with the party in a box.  Inside the party box was a mini celebration that began as soon as the package was unwrapped.  It was so well received that I replicated the same idea for a group of my daughters close friends when they graduated from high school.

What you need for a Mini-Party Box

Balloons and Streamers- This made the filling for my package.  After lining my box with tissue paper, I used curling ribbon for streamers.  The curling ribbon works well since it will remain in excellent twirled form even after bouncing around the mail truck!
I also added small blown up balloons.  Because I didn’t fill the balloons with too much air they were unlikely to pop and made for a festive package filling!

 Gifts-  Wrap your gifts or cards and include them in the box.  I usually send cards with money for graduations and the party box makes getting a card all the more special!

 A banner-  Every congratulatory party needs a banner and the party box is no exception.  I taped together long narrow strips of colored paper.  After writing out Congratulations, I used my favorite scrap-booking accessory and punched out colored circles for each girl’s name.  I than rolled it, tied it up with curling ribbon and placed it in the box along with the gifts.

 Cake-  Since sending a cake was not an option, I sent this wonderful box of chocolate Lindt Petits Desserts.  It was perfect!  They looked like petit fours and are quite delicious!  You can locate them by checking the Lindt website.
There are lots of wonderful options available!

 Guests  Lastly, every party has to have guests.  So I created a tri-fold, stand on it’s own, guest card made with cardstock and filled with pictures of my family.  I even included a picture of the dog! I folded it up, labeled the outside and tied it with ribbon.


Party in a box gift
Party in a box gift

The party box idea can be used for any celebrations.  Send me ideas on how you have used the Party in a Box idea for your out-of-reach celebrations!

40th Birthday Party


Welcome to a house of mourning, where the last of our clan is turning 40!


40th Birthday Party        

A few weeks ago, we surprised, astounded and stunned my brother on a chilly Saturday evening.  I lured him to my home with promises of expertly prepared tenderloin and all the fixings.  Foolishly, he accepted my invitation thus falling prey to the devious efforts of his family.  Later he said, as he turned on to my street he wondered why there were so many cars.   As he pulled into the driveway, he knew we had him.  Staggered throughout the snow banks along my sidewalk were obnoxious 40+ sayings printed on cards.  On my porch, my nephew was playing taps.  Black ribbons adorned the left over Christmas decorations.  Oh, we had him good!


Playing taps for the Birthday Boy!

Whenever I have a party, my wish is to greet my guests before they enter my home with some sort of welcome as if to say – we are so glad you came!  In this case, the guests all appreciated my efforts at decorating, with the exception of the birthday boy!  My deed was done!


Birthday Signs for the 40 year old!

40 plus Birthday Signs

The signs I had printed at a copy center on card stock. My home printer is an ink jet and I knew the ink would run if it snowed so I wanted the signs laser printed.  My cost was only $2.15 for a dozen signs and it is super easy to do.  Just send a PDF to your local copy center with directions for printing.  Then, go pick them up! Using different fonts on multiple colors of card stock, made the signs fun, easy and inexpensive!  My three favorite things!

Birthday Signs
Celebrate the 19th Anniversary of my 21st Birthday!
40 Happens
Halfway to 80
40 Years,  Est. 1974
Lordy, Lordy look who’s 40
Holy #%*@  You are 40!
Cleverly Disguised as a Responsible 40 year old!
It took me 40 years to look this good!
I’m not 40, I’m 18 with 22 years of experience!
Looks 18
Feels 14
Acts 8
That makes 40

Click here for a PDF file:  Birthday Signs for the 40 year old


Mourning Veils
Mourning Veils

Mourning Veils

As you can see in the very solemn picture, the ladies are all sporting black veils!  This was super easy to accomplish.  I purchased black netting and black curling ribbon.  Netting usually runs around 1-2 dollars per yard – so – very cheap!  We cut the netting in 24-inch lengths and 8-inch widths then tied a black curling ribbon a third of the way down the long length.  This provided a great spot to use a bobby pin and pin the veil in place on the top of our heads.  The veils made my brother laugh so we met our goal – to humiliate and have fun!

Party Food     

Luckily for me, my guests contributed to the menu for the evening and my only duty, besides providing the venue, was to have beer and wine available for all the guests.  I did have my husband prepare a favorite appetizer.  Bacon-Apple-Jalapeno Pop ‘Ems

These are very yummy.  Even my niece, who is only 8, declared she had 4 of them so don’t let the Jalapeno portion of the recipe sway you.   The recipe calls for the jalapeños to be seeded, but my “spicy-loving” husband, likes to leave the seeds in a few of the appetizers.  He indicates the HOT ones my leaving on the stem of the Jalapeno. I personally know better and will never eat the stemmed Jalapeno appetizers, but not all my guests have my sense.  One time my brave/foolish sister tried a HOT one and ended up drinking cream to wash the fire away.  It was very funny!  Yes, I can be a bit sadistic!