Tag Archives: healthy breakfast

Breakfast Burritos

Burrito
Burrito

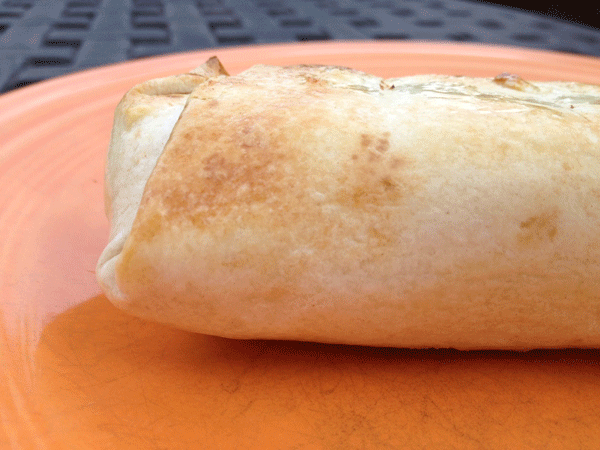
Here is a breakfast burrito recipe that is absolutely delicious!  The combination of eggs, bacon, peppers & onion and just enough jalapeño to give this recipe a little kick, will get your day going!

Here is the recipe so you can enjoy them too!  A printable copy can be found at the bottom of the post!

Breakfast Burritos
This recipe makes enough to generously fill  4 – 10″ tortillas

1/2 small onion, diced
1/2 green pepper, diced
1 jalapeño, diced (optional)   At my house – it would be 2 jalapeños and –  Not Optional!
4 slices of cooked bacon, crumbled
8 eggs
1/2 cup milk
1&1/2 cups grated cheese –  I like pepper jack & cheddar mixed
salt & pepper to taste
small amount of oil to prepare the frying pan

Egg Burrito Ingredients

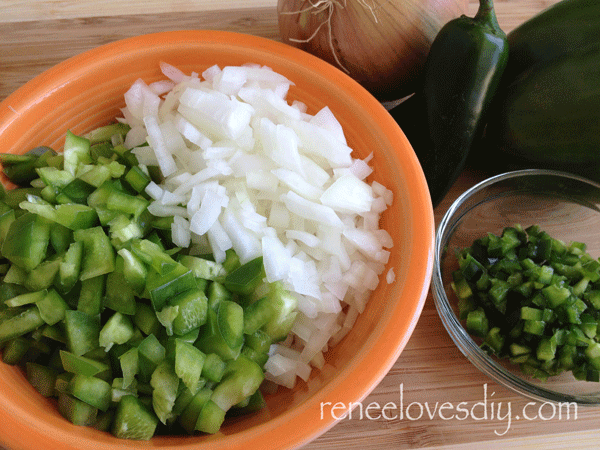
Saute the onions, pepper and the jalapeños until the onions are translucent and the peppers are soft. Transfer to a medium sized bowl.

Bacon for an Egg Burrito

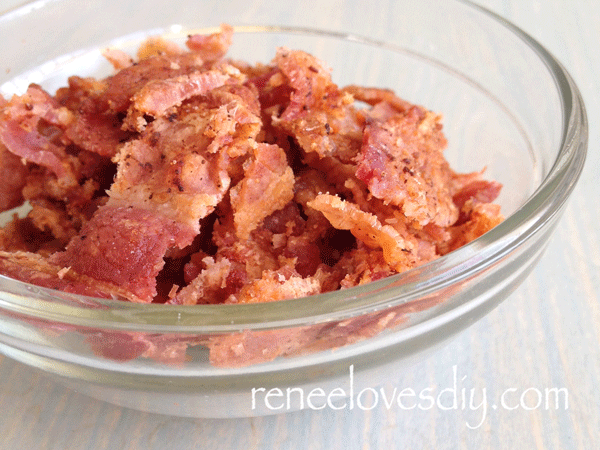
Crumble your cooked bacon!

Scrambled Eggs for Egg Burrito

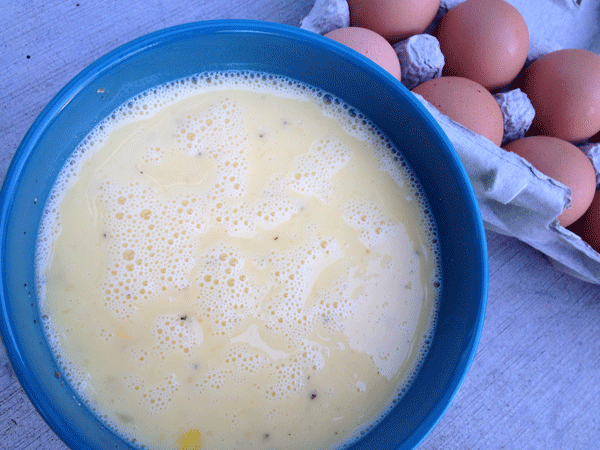
In a medium bowl, mix the eggs and milk.  Whisk until well blended and season with salt and pepper.

Scrambled Eggs for Breakfast Burrito

Heat a greased skillet over medium heat.  Pour the egg mixture onto the heated pan and gently stir until the eggs are set.  Transfer to a large clean bowl.  Add the onion/pepper mixture,  crumbled bacon and grated cheese.  Mix until blended.  Check seasoning!

Egg Burrito
Egg Burrito

Place one fourth of the mixture onto a warmed tortilla.  Fold up and enjoy!
They are delicious!

Here is the Printable Recipe!

[gmc_recipe 1954]

Delicious Egg Burritos

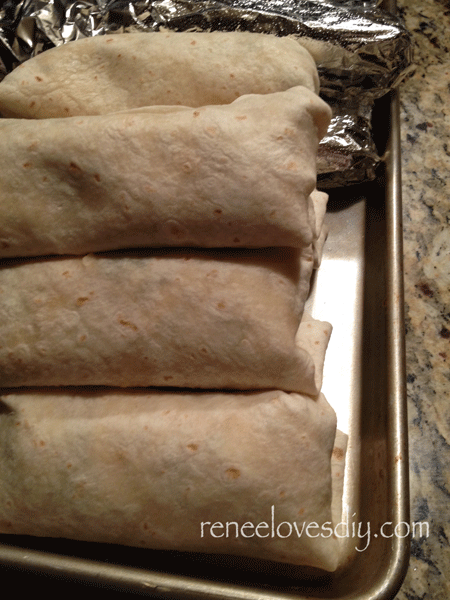
When I make Egg Burritos,  I like to make a few extras to throw in the freezer!

Delicious Egg Burritos!

The last time I prepared these burritos I needed 40 of them.  My husband was participating in a family fishing tournament and he needed to provide breakfast for 27 fishermen!  I came up with the idea of preparing the egg burritos and freezing them so it would be easy to transport them and then simply reheat them in the oven!

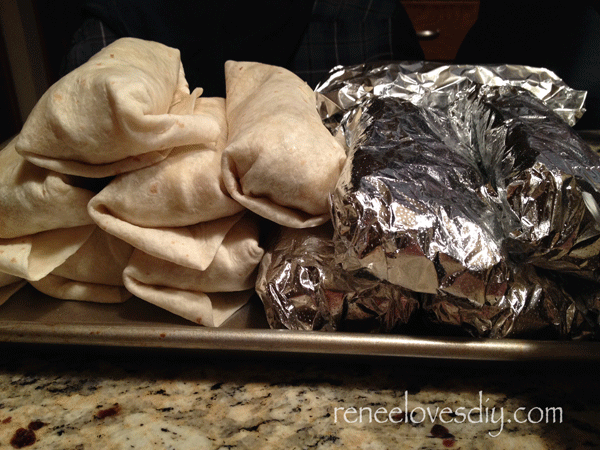
Now you know why I have pictures of mounds of burritos!  I made piles and piles that day.  We also wrapped each burrito in aluminum foil to make it easy to prepare them in the oven!

I am including the recipe for 40 Breakfast Burritos –  for anyone who is as crazy as I am!

40 Breakfast Burritos

3 large onions, diced
6 green peppers, diced
6-10 jalapeños, diced
40 sliced of cooked bacon, crumbled
60 eggs
4 cups of milk
3 lbs grated cheese

Prepare the above ingredients in the same manner as the recipe for a mere 4 burritos!

Because I was making such large quantities and because I am very concerned about food safety; I immediately cooled everything as I prepared it.  Starting with the bacon, once it was crumbled I refrigerated it, same thing with the pepper mixture and the grated cheese.  The last step was scrambling the eggs.  I prepared half the scrambled eggs at a time.  I cooled the cooked eggs in a metal bowl that I placed in an ice bath.  After it had cooled, I added half of each of the bacon, pepper mixture and cheese.  I then mixed this well, checked my seasoning and filled my tortillas.  I wrapped each burrito in aluminum foil.  As soon as I had a cookie sheet filled with a single layer of burritos, I placed them in the freezer.  I then prepared the rest of the scrambled eggs and did it all again.  Once the burritos were frozen, I placed them in labeled ziploc bags.

The frozen burritos can be reheated in the microwave.  Check after one minute!

Frozen burritos can also be reheated in the oven:

Preheat oven to 350 degrees.  Place frozen burritos in the oven for 20-30 minutes.  If you want them toasted on the outside, remove the aluminum foil after 20 minutes and place them on a pan and return the burritos to the oven.  Cook until the desired crispness is attained!

Update:
The breakfast burritos were a big hit with the fishermen!  I guess I know what I will be making for their next fishing trip!

Recently, my sister had lots of company and prepared 20 breakfast burritos ahead of time and froze them.  The morning she had to feed her guests , she reheated the burritos in the oven and the burritos were ready for each person as they woke up!  She said it worked perfectly and everyone enjoyed their breakfast burritos!


Muesli – It’s not just Oatmeal!

Bowl of Muesli
Bowl of Muesli

Swiss Muesli is one of my all time favorite breakfasts and one my family requests regularly!  Recently, I picked up my daughter from college and she asked if I would make her muesli because she had been craving it! I love that she appreciates my cooking!

It was on a family vacation to Banff, Canada that I discovered Swiss muesli.  At the time, my husband was in his “Swiss” phase of life.  He had just returned home from an extended business trip to Switzerland and was undergoing a bit of an identity crisis.  Ok, I’ll just say it – he thought he was Swiss.  All he talked about was staying in his flat… eating cheese and bread…. drinking wine each night…. eating raclette…. Yeah – well, while you were gone I was eating macaroni and cheese with the kids and I have no idea what raclette is?

Luckily, this crisis of his wasn’t overly concerning.  He was still speaking English and if anything, I felt bad.  If I found his “Swissness” annoying think of what it must have been like for the Swiss! I knew in a week his selfhood would be restored and the benefit of his crisis was that he did introduce me to a wonderful dish called Muesli!

The muesli I was served that day in Banff was cool, sweet and satisfying.  The creamy milk soaked oatmeal was mixed with fresh fruit, dried fruit, and nuts and had just a touch of sweetness.  It was hearty, with a wonderful texture and very filling.  After scraping every bit of it out of my bowl, I asked the server how the muesli was prepared.  She eagerly explained to me the effortless process of soaking the oatmeal in milk/cream, sweetening with maple syrup and adding whatever fruits and nuts you desired.  The muesli they served that day had freshly cut apples, raisins and nuts.  It was wonderful.

Below you will find my recipe.  It’s not much of a recipe, because you make it however you want.  Read on and you will see what I mean! The muesli I was served in the restaurant was prepared with rolled oats.  I have used quick cook or old fashioned, depending on what I have in the cupboard and the amount of time I have to allow the oatmeal to soak. Yes – you guessed it – quick cook oatmeal softens faster!

On the mornings I wish to make muesli, I deposit a cup of oatmeal in a medium sized bowl and cover with milk.  I then place it in the refrigerator to soak for 30-60 minutes.  This gives me plenty of time to make myself presentable and allows the oatmeal to soften and cool.  After the soaking time, add additional milk, some cream (it’s worth the calories – just a little bit provides a creaminess that makes everything better), and whatever fruits and nuts you like.

 Basic Muesli Recipe:

Cover 1 cup of rolled oats with milk and refrigerate for 30-60 minutes to soften. Once softened add: Milk or cream to thin. Maple syrup or honey to sweeten Chopped nuts Dried fruit Shredded coconut Cut up apples, bananas, berries…. The sky is the limit – add whatever combination you would like. My favorite is:  cut up apples, dried cranberries, chopped walnuts, shredded coconut, maple syrup, milk and a little cream.

Muesli using Steel Cut Oatmeal

A little more time, but well worth it! Recently I read an article about the merits of steel cut oatmeal at eatdrinkbemellow.com.  After reading it I thought, what the heck, let’s try it in Muesli! The muesli with steel cut oats was absolutely fabulous and well worth the extra time!  It’s definitely my new favorite!

Preparing the Oats – Over medium high heat melt one tablespoon of butter in a pan and add 1 cup of steel cut oats.  Toast the oatmeal for a few minutes then add two cups of water.  Bring to a boil, cover and let simmer for 10 minutes.  Remove from heat and let it sit for an additional 10 minutes to soften.  Transfer the oatmeal to a medium sized bowl and refrigerate.  You may notice the oatmeal is almost dry.  I make it that way because I want it to retain it’s nuttiness and because there will be plenty of liquid added later on with the milk, cream, and sweetener.  Once it is chilled, we are ready to make Muesli.  Usually, I will prepare the steel cut oatmeal the night before so it’s ready to go first thing in the morning. Now the fun part – add any of the above ingredients to personalize it to your tastes!

Enjoy!

We love Muesli!
We love Muesli!

Want to know where Muesli began? – Wikipedia/muesli