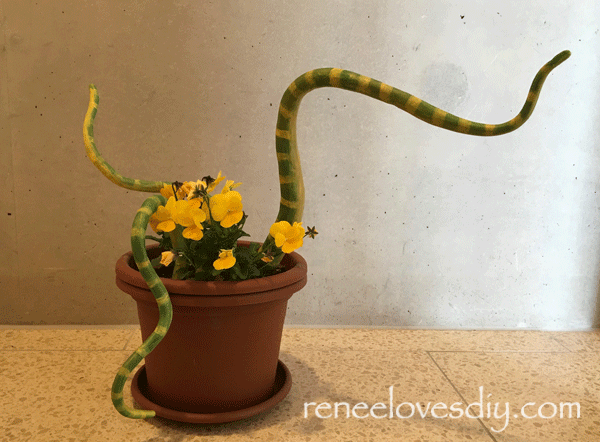
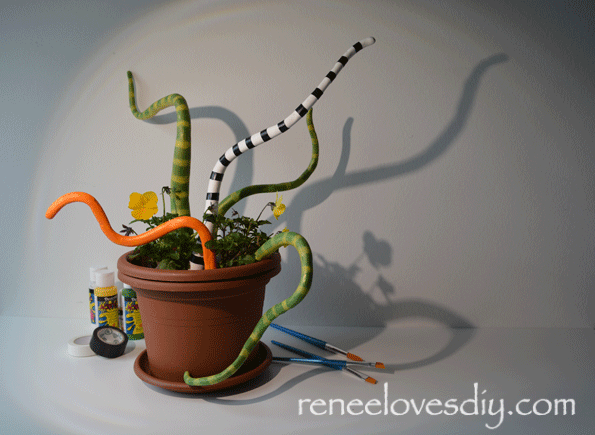
Even though, Halloween is not widely celebrated in Switzerland, I have decided to have a festive Halloween Party complete with decorations!! Because the availability of Halloween trimmings is very limited here, it has been necessary for me to come up with a few of my own decorations. Here is what I created to adorn my front door as an ominous indicator of what may be lurking inside!
The Halloween Tentacles are very simple to make!
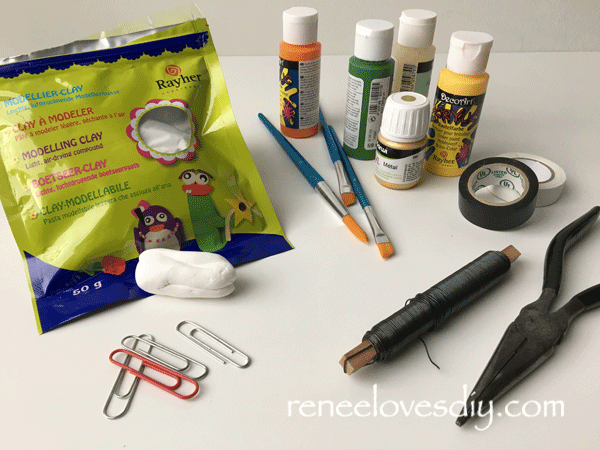
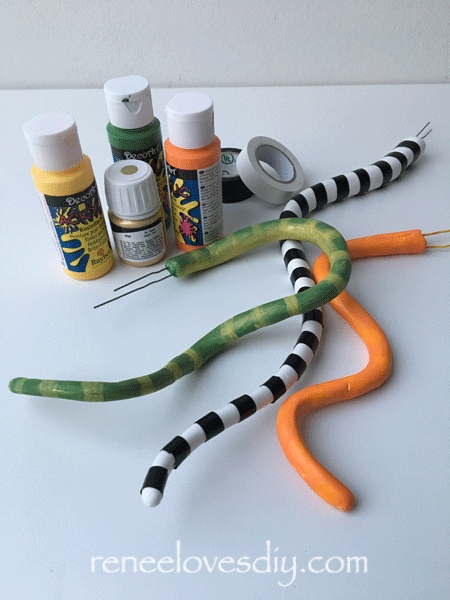
What do you need? Air Drying Clay – Rayher & Crayola make clay that is perfect. It is nice and light and it comes in many colors! Large Paper Clips Wire – I used 22 gauge. Floral wire will work perfectly! Wire Cutter Paint or Tape – If you wish to embellish your terrifying tentacles! I find electrical tape is wonderful to use here because it can be stretched a bit to fit tightly around the tentacle!
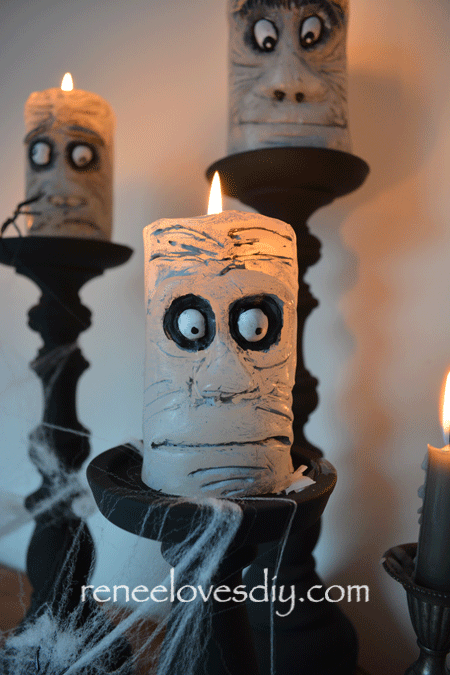
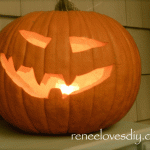
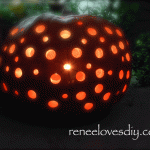
Recently on Pinterest, I found a picture of some adorable Halloween candle sculptures! The sculptures were fabulous, but I was disappointed by the fact that they could not be used as candles! For Halloween there is nothing better than the ominous glow of candle light! Lots of candle light!!
The wonderful thing about Pinterest is the inspiration it provides and that’s exactly what happened! Seeing the adorable Halloween candle sculptures on Pinterest inspired me to create my own Halloween candles!
This post is about molding candles into eerie faces, with eyes that ooze out of their sockets as the candles melt!
Now that’s a Halloween candle!
Spooky Halloween Candle
First things first – What kind of candles?
After much trial and error, I discovered that the candles with a rough texture on the surface work the best. Why? The wax is consistent throughout the entire candle.
In the picture below, you can see the two rough candles to the right and the smooth candle on the left. Do not use the candles with the smooth outer layer. The wax beneath this smooth layer is different and crumbles as you sculpt.
Also, as much as I hate to say it, beeswax candles are very difficult to use for this project. The wax is just too hard. Save those candles for all the other holidays!
Spooky Halloween Candle
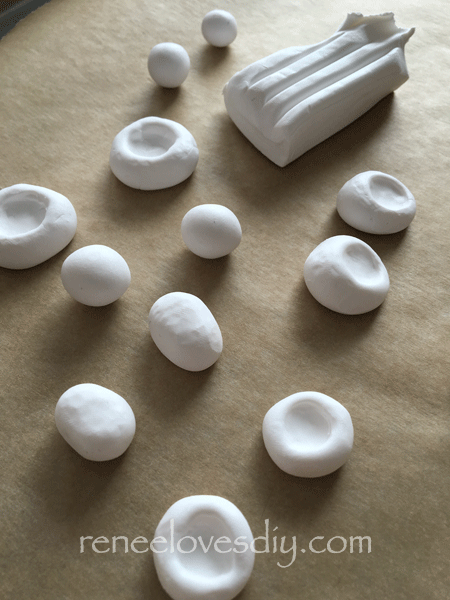
On to the eyeballs! I used FIMO clay. I formed different sized and shaped eyeballs, baked them for the appropriate length of time and viola – eyeballs!
Clay for Halloween Candle Eyes
Some of the eyes I painted ahead of time and others I painted later, after inserting them into the candle! It’s totally up to you!
Halloween Candle Eyes
Softening the candle!
I found the best way to do this was to put the candle in the sun and create a greenhouse effect by covering the candle with glass. The candle will become warm and soft enough to be molded into a face.
When working with wax you must always be careful because it is flammable and can be dangerous! I found the candles, when heated this way, became quite warm and did begin to melt so you must watch them because you do not want a puddle!
Bottom line – always be careful with wax!
Spooky Halloween Candle
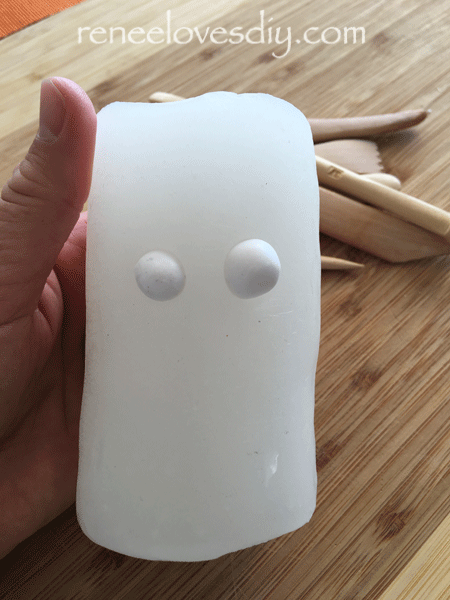
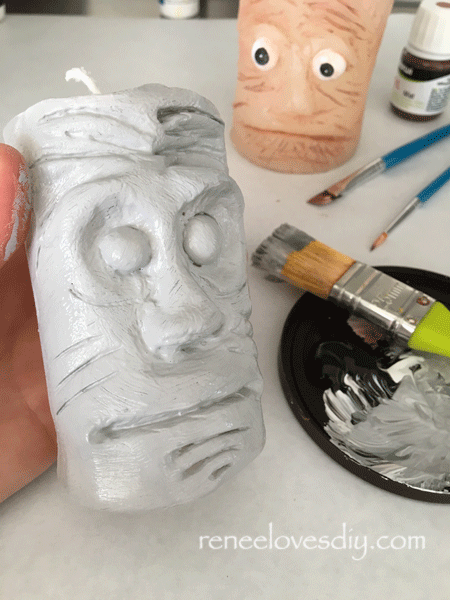
Now on to the molding of the face!
Once the candle is soft, push in a couple of eyeballs and start molding. I have wooden carving tools shown below that I use, but it’s not necessary. Kitchen utensils will work too!
Spooky Halloween Candle
Using your hands and tools, mold a face onto the candle. Along with eyebrows, nose and mouth, I like to add lots of wrinkles!
Here is a short video showing the molding and painting process!
One more thing, while the candle is still soft, press the bottom flat against your working surface to be sure the candle stands straight. We don’t want any tippy candles!
Spooky Halloween Candle
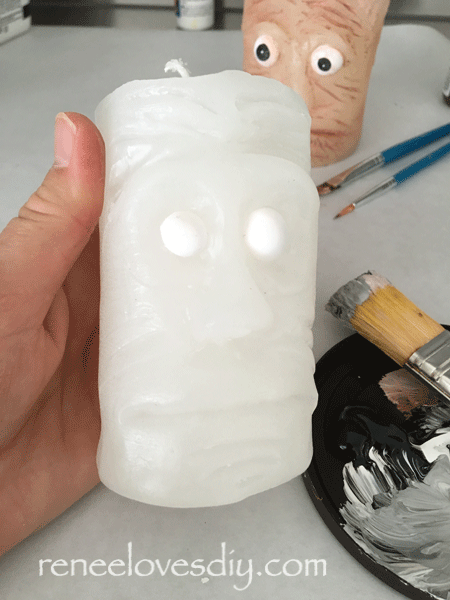
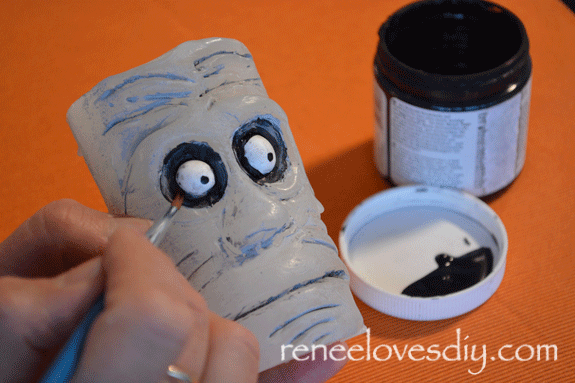
On to the painting!
As you can see in the above picture, it is difficult to see all the features of the candles face. By adding color in the right places on the wrinkles, nose, eyes… all those features will pop!
Below you can see that I covered the candle with paint to fill in all the wrinkles and features I added in the molding process. Once I have all the crevices filled, I removed most of the paint with paper towels. That way all that is left are the accents in all the right places!
Spooky Halloween Candle
To lengthen the drying time of your paint, which will make it easier to remove the excess paint from your candle, I mixed in an acrylic medium. You will find it right along side the acrylic paint and it is translucent white. This is useful stuff to always have on hand!
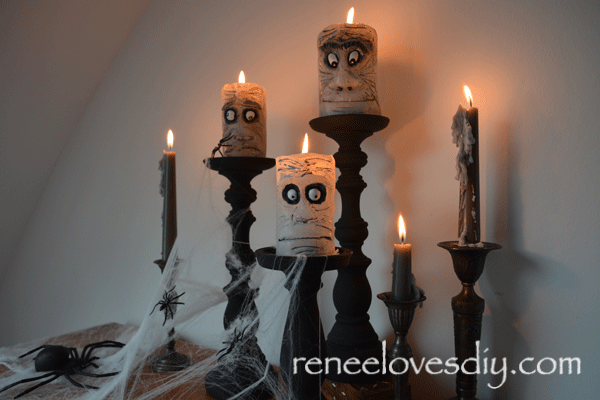
A few finishing touches around the eyes and the candle is ready for Halloween!
Spooky Halloween Candle
What a fun way to create the ominous glow of candle light for Halloween this year!
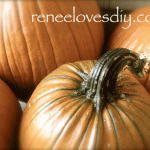
There is nothing scary about the Etched Pumpkins, but they are beautiful!
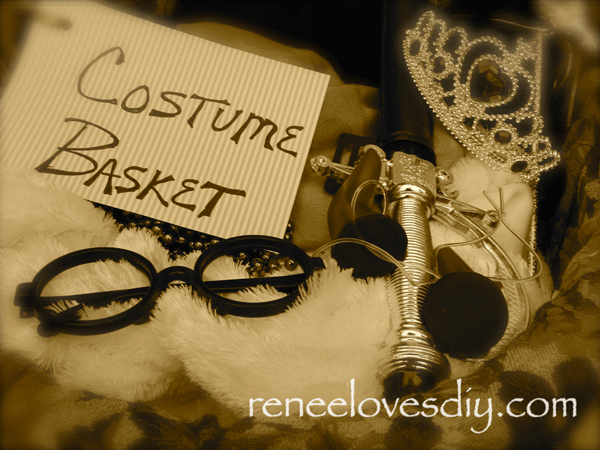
Costume Basket
For those guests who forgot their costumes, a basket full of treasures for them to discover who they will become for the night!
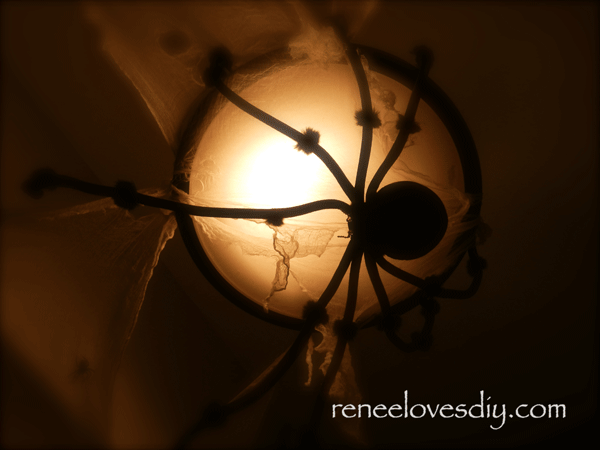
Entry Way Spider
Don’t look up!
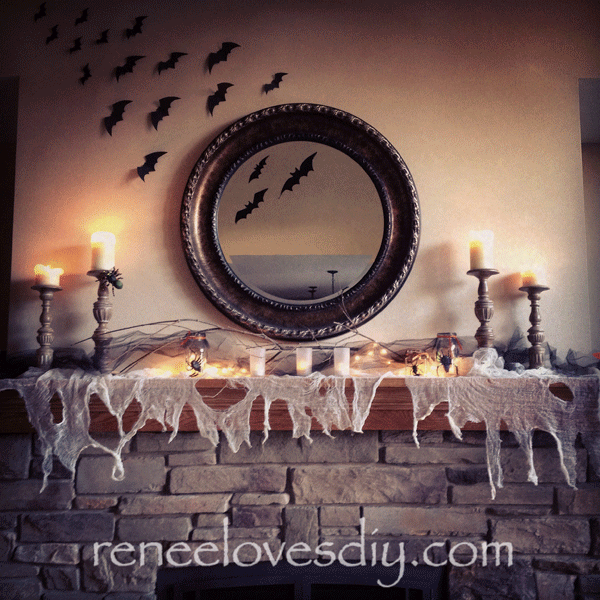
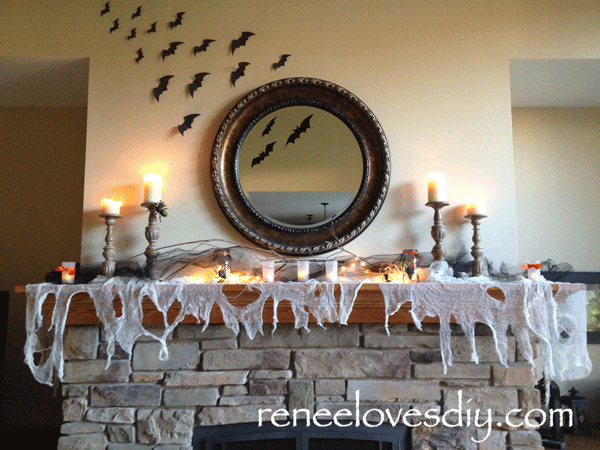
The mantel is all decked out for Halloween!
The Mantel was my favorite! Find out how to make the Cheese Cloth Spider Webs and Creepy Captured Critters on the links provided! The bats on the wall are cut from card stock and create a nice effect!
Captured Critters for Halloween
Halloween Bugs
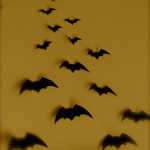
Bats and more bats!
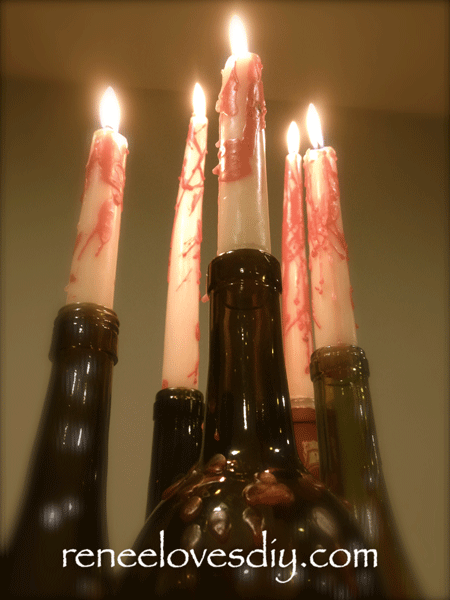
Bloody Candles for Halloween
The Bloody Halloween Candles were very fun, but we almost had a mishap! A guest ran into the candles with her fabulously large floppy hat. Luckily, the hat snuffed out the candle and a crisis was averted! I immediately relocated the candles to an area absent of floppy hats!
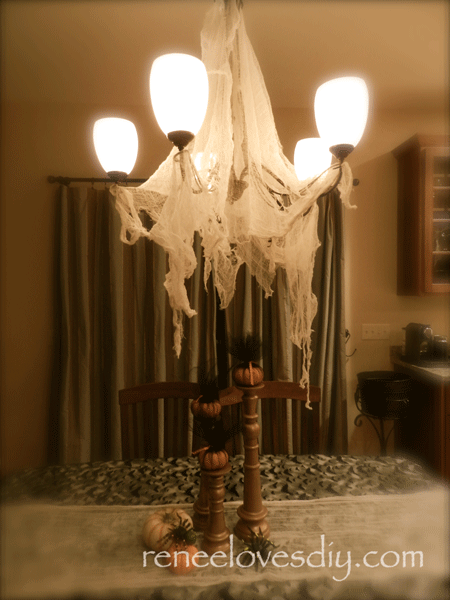
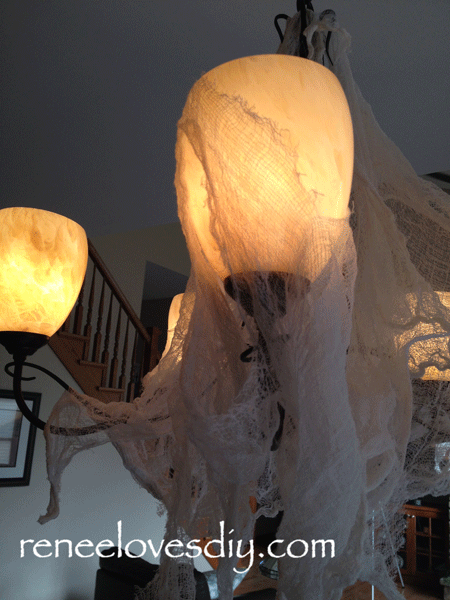
Halloween Party Chandelier
I loved the chandelier! It was so easy and is simply draped with Spider Web Cheese Cloth! The Tulle Wrapped Pumpkins worked wonderfully under all those webs! Definitely not a place for burning candles!
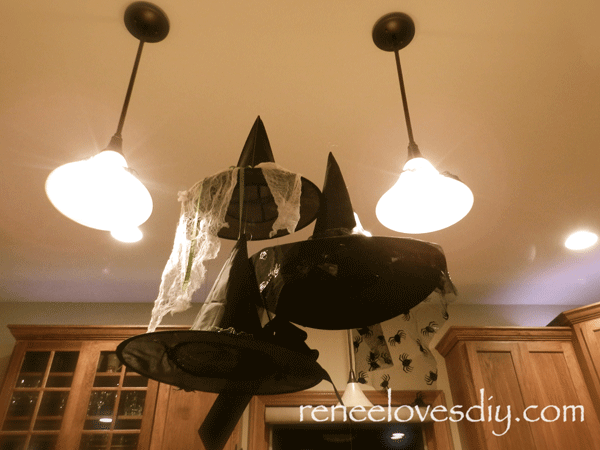
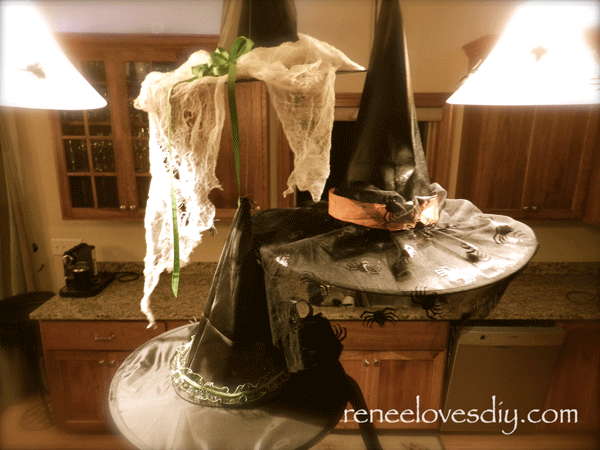
Floating Witch HatsFloating Witch Hats
Everyone loved the floating witch hats! Using fishing line, I simply suspended the hats between my two pendant lights. Fishing line is easily threaded into a needle so sewing the fishing line into the tip of the hat was easy! I threw on a few embellishments and voila – fun floating witch hats!
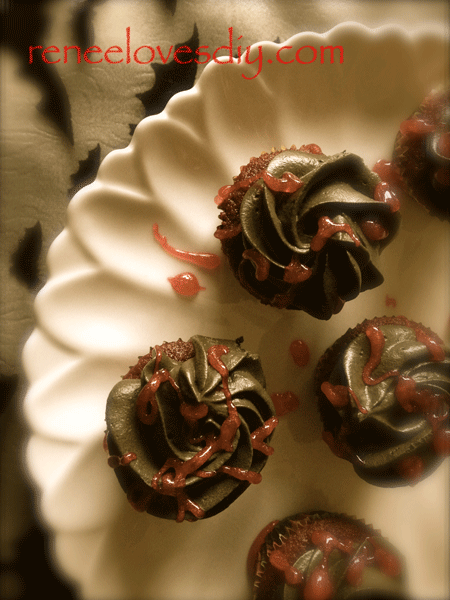
Halloween Cupcakes
I wanted a delicious, but creepy dessert. I topped red velvet cupcakes with black dyed cream cheese frosting and dripped them with blood (red frosting gel) before serving!
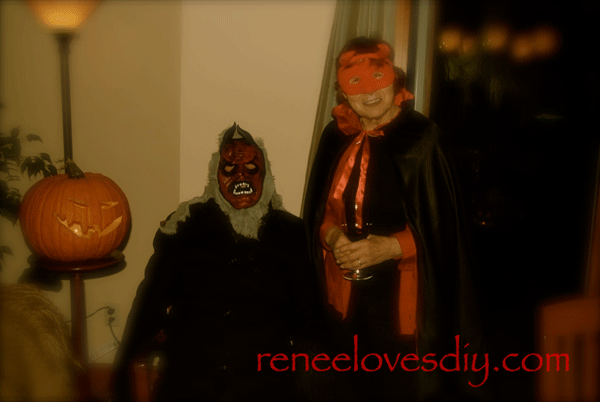
Guests of Honor
Even my parents attended my party this year and they had a wonderful time – those devils!
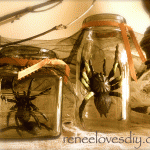
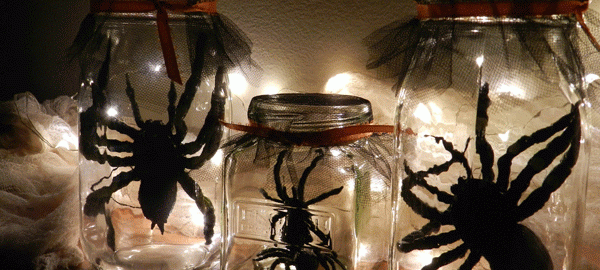
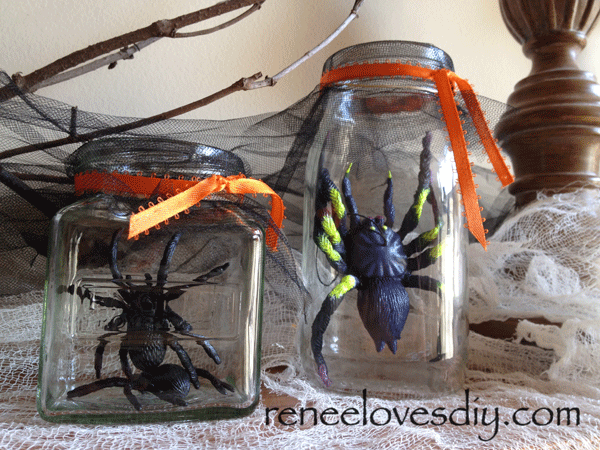
This is so easy and so fun! I saw something similar on Pottery Barn where they sell the most wonderful creepy bug vase filler! They placed the bugs in jars, lit them from behind and what you see will make your skin crawl – I love it!!
What do you need?
Large Plastic Bugs
Clear Glass Jars
Tulle
Rubberbands
Ribbon
A string of lights
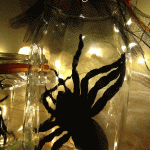
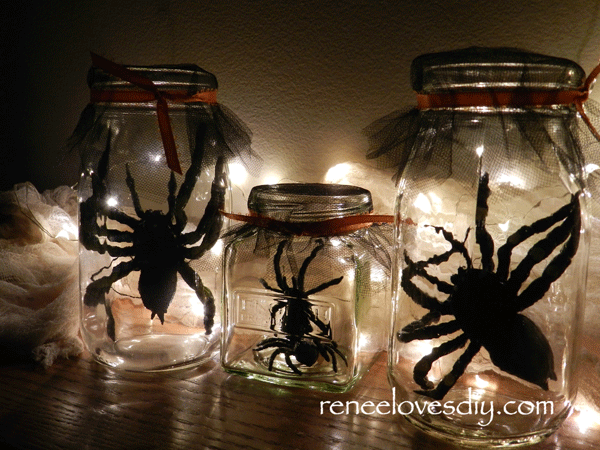
Creepy Critter Halloween Decoration
How did I do it: I stuffed a large plastic bug into a jar so the beast is standing up, for the most part! I then “sealed” my jar with netting or tulle, secured it with a rubber band and tied on a ribbon. I could have simply placed the lid on the jar, but we all know bugs need air, thus the netting! Plus, it creates a creepy feeling that they might just escape!
Creepy Critter Halloween Decoration
Now for the light part! I have fairy lights so I used them. Fairy lights are LEDs and look like tiny little droplets of light on a thin wire. These worked perfectly tucked behind the bug filled jars! Fairy lights are very cool!
If you don’t have fairy lights, regular white christmas lights will work too. I like to use led lights because they don’t get hot and they use a lot less electricity! To camouflage the lights, I used a bit of cheese cloth spiderweb! Yes – I have a post on Cheese Cloth Spiderwebs too! Check it out!
What I love the most about cheese cloth spider webs is how easy they are to put up, take down and store!
I like to go a little crazy decorating for Halloween, but I don’t want to spend days putting it all together and days taking it all down.
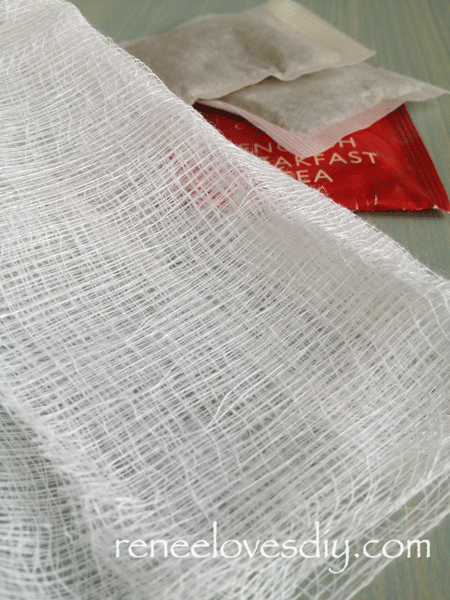
Cheese Cloth for Spider Webs
What do you need:
Cheese Cloth
Tea
How to make them:
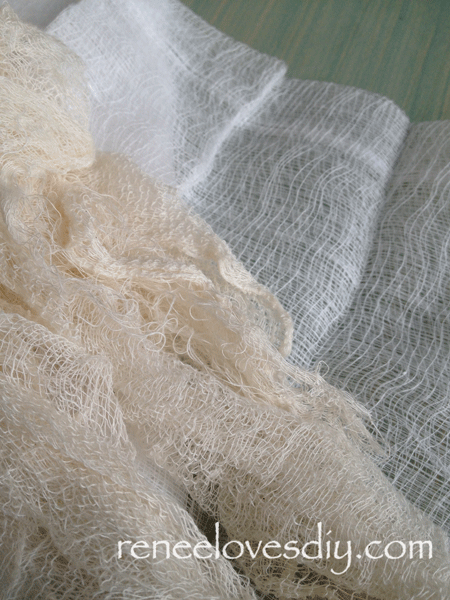
Purchase cheese cloth from any fabric store. It is very inexpensive! I like to make my cheese cloth look dirty so I pull out all the old tea bags that have been sitting in the cupboard for way too long and make a big pot of tea. After the tea is a nice dark color, I place the unfolded cheese cloth in the tea and let it soak. I allow the cheese cloth to soak 10-20 minutes.
Cheese Cloth for Spider Webs
After dyeing, I remove the cheese cloth from the tea, gently rinse and let dry. You can see in the above picture the difference in color after soaking in tea!
Halloween Cheese Cloth Spider Webs
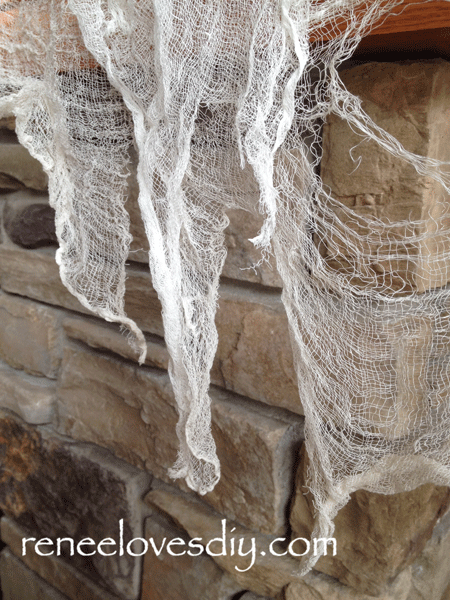
Now for the fun part! Drape the cheese cloth wherever you want that eerie effect! As you do this, rip holes in the cloth, and cut it where you want it to hang down. Where ever you cut the cloth, pull on it and the sharpness of the cut will disappear! Experiment with the cloth to create the effect you want!
Halloween Cheese Cloth Spider Webs
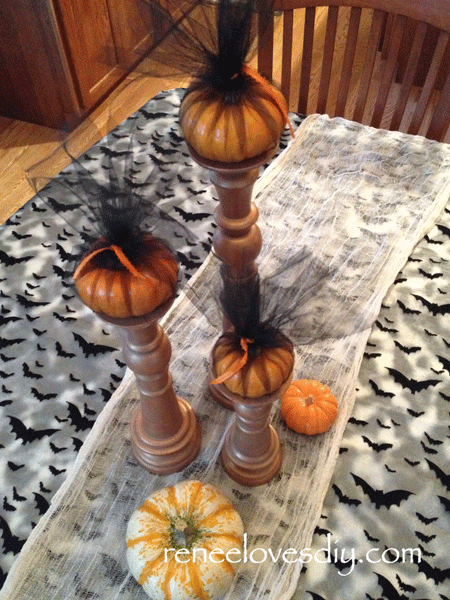
I also like to use a length of the stained cheese cloth as a table runner for my Halloween table!
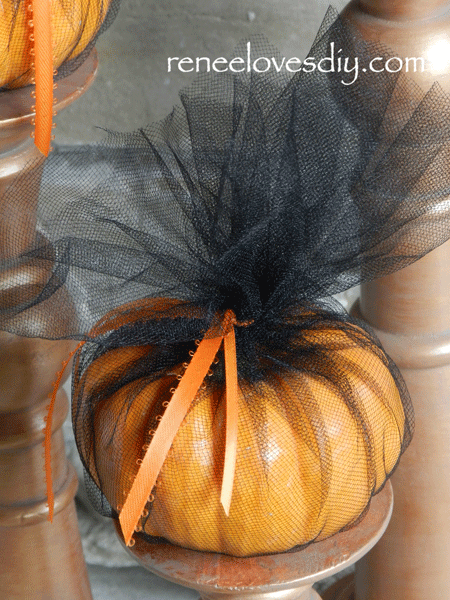
Wrapping pumpkins has become quite popular lately and is something I have been doing for years! Rather than purchase a wrap, make your own with tulle.
Tulle is a netting like material that is very inexpensive and comes in a variety of colors! Go to the fabric store and purchase tulle and ribbon, that is all you will need. I like to get black tulle and orange ribbon, but whatever colors you choose will be great!
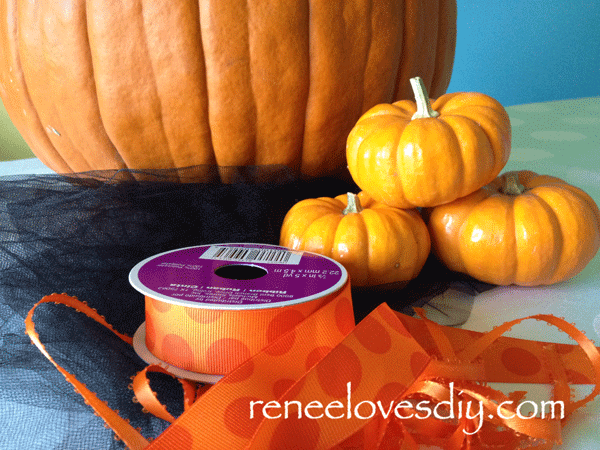
What do you need?
Pumpkins
Tulle
Ribbon
Rubberbands
Tulle Wrapped Pumpkins for Halloween
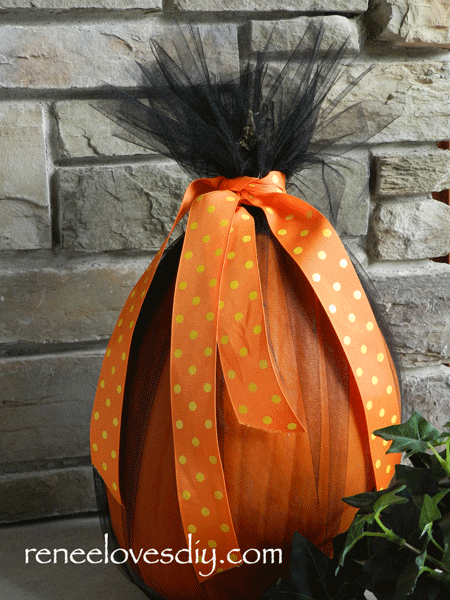
For large pumpkins, measure the height of your pumpkin and cut a square of tulle that is double the height plus 12-18 inches! Place your pumpkin in the center of your square, gather the ends at the top and secure at the stem with a rubber band. Now tie on your ribbon and trim the edges of the tulle – done and beautiful!
Tulle Wrapped Pumpkins for Halloween
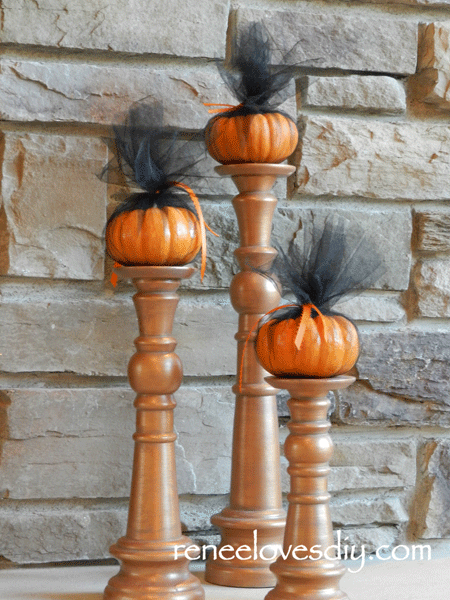
I also like to cover small pumpkins and place them on candles holders! This makes for a wonderful centerpiece!
The small pumpkins require a 12 inch square of tulle. Tie it up with a ribbon and you have created a delightful Halloween decoration that will last right into Thanksgiving!
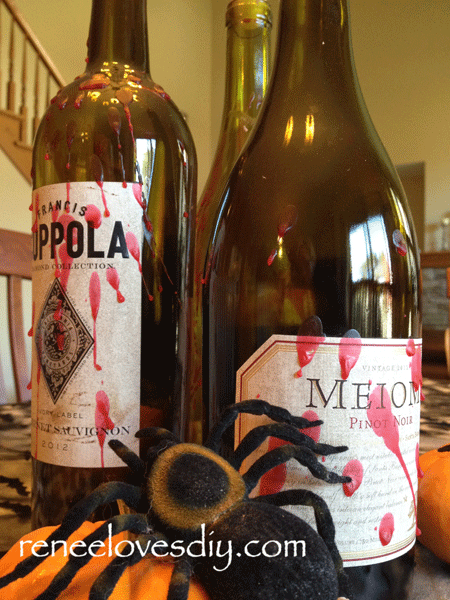
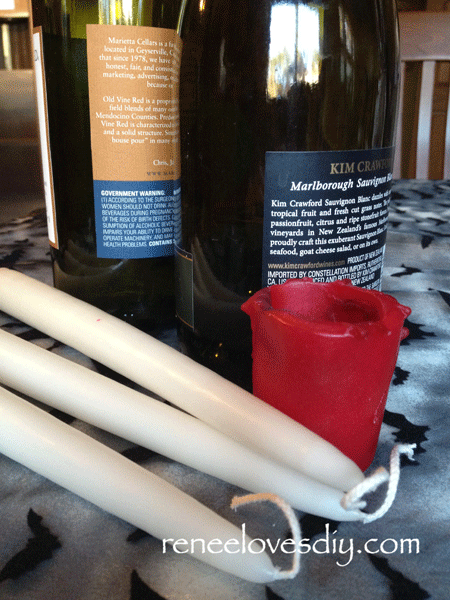
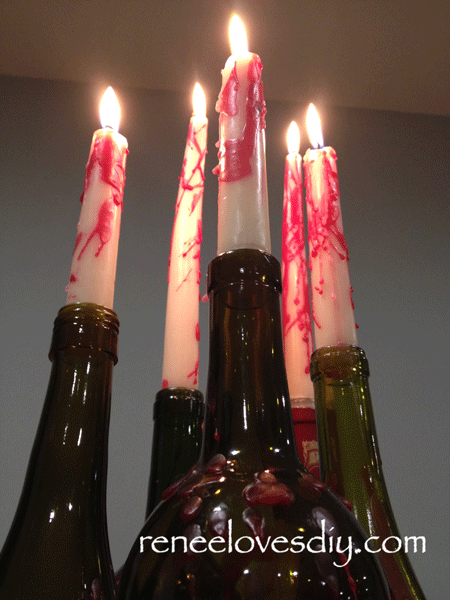
Here is a super easy Halloween decoration anyone can make in just a few minutes with candles and empty wine bottles. If you don’t have any empty bottles, then my advice is to take your time – empty the bottles slowly! No need to chug!
Supplies:
White Candles
One Red Candle
Empty Wine Bottles
Dirt!
Candle Supplies
Let’s begin!
I wanted my wine bottles labels to look old so my plan was to pull out my paint and glaze and attempt to give the labels an antiqued look when I thought of a much easier idea! Just rub dirt on the label! Dirt is safe enough! Just last week, I watched my nephew eat dirt and he seems fine!
After rubbing the dirt into my wine bottle labels, I gently washed them and let them dry!
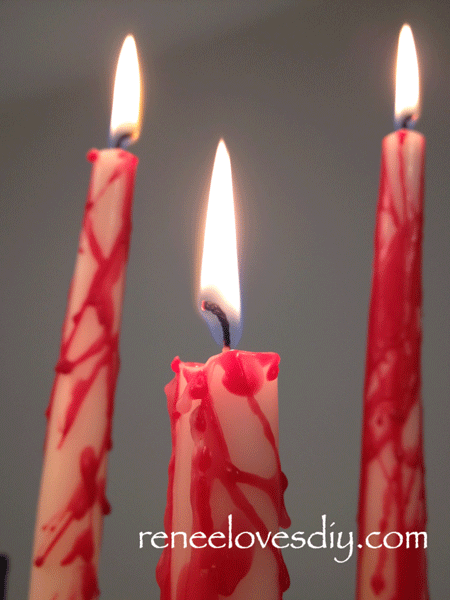
Now for the blood!
Light the red candle and as the wax melts simply drip it over the candles and the wine bottles. The wax will form nice drips and clumps that look like coagulated blood – disgusting!
Bloody Candles
That’s it – see how easy that was!
Make sure the candle is firmly inserted into the wine bottle and that you burn them in a safe location!
I love Halloween and I love to carve pumpkins! Mid-September I start picking up pumpkins for fall decorations around my home. Because carved pumpkins will only last a short time, I wait to carve them until a few days before Halloween.
This year I am trying something new! I am etching my pumpkins with a design and leaving them whole – at least for the time being! I have etched pumpkins before, but then my process was to “gut” the pumpkin, thin the wall, and light a candle inside to see the etching glow! It is very cool.
This year I am doing my etchings early, leaving the pumpkins whole and later I can “gut” them if I wish.
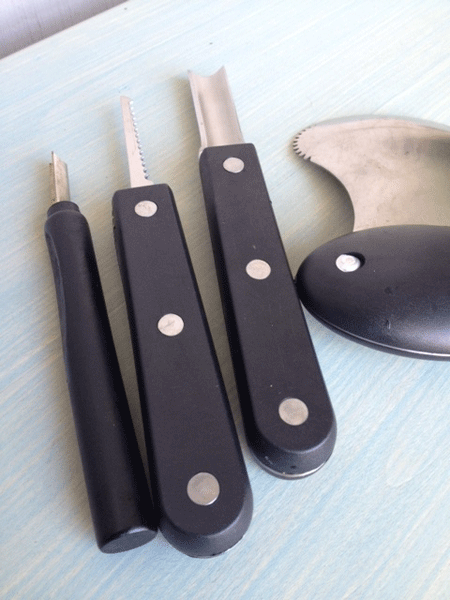
Pumpkin Carving Tools
The tools I used for this project were purchased from Williams Sonoma. They are excellent quality and should last for years! Currently, they have a similar product – the Pumpkin Carving Tools 3-piece Set. Included in this set is an etching tool, which is what I used here. The etching tool is also called a linoleum cutter and if you happen to have wood carving tools, they may work as well. For whatever tool you use, the goal is to remove the top layer of skin from the pumpkin!
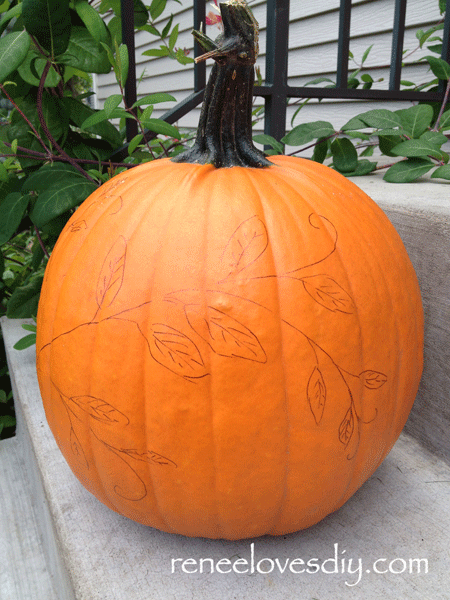
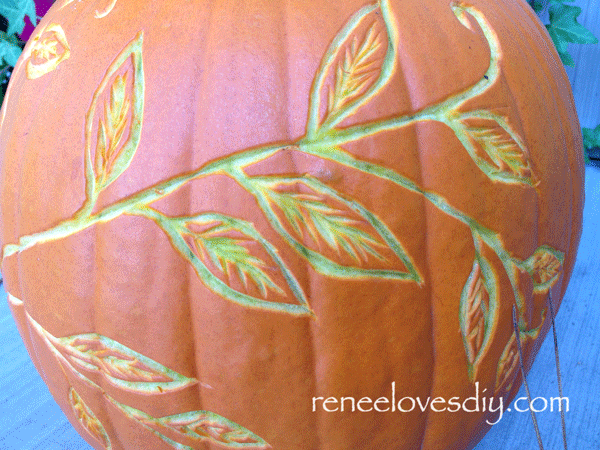
Pumpkin with Vine Drawing
Before I began the etching process, I drew an image on my pumpkin. Here I show a roughly drawn simple vine. It was not necessary for it to be perfect since it is just a guideline.
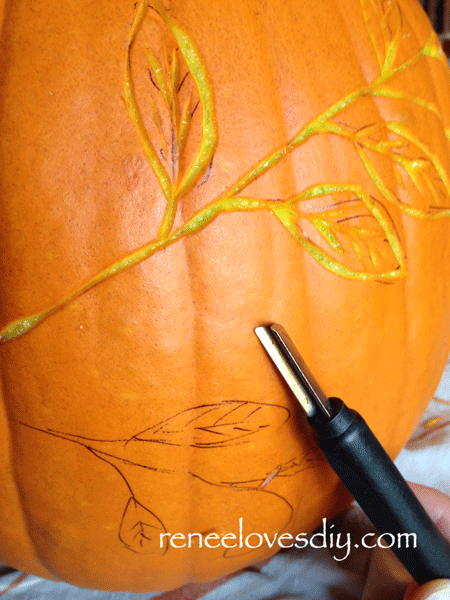
Etching a Vine on a Pumpkin
Then, using my etching tool, I carved out the vine.
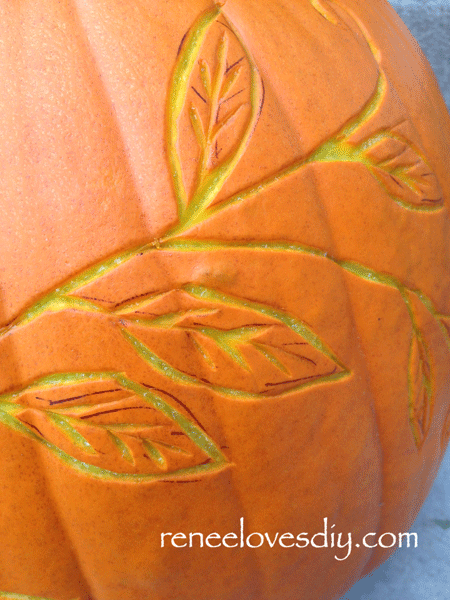
Etching a Vine on a Pumpkin
When I finished etching, I used a Magic Eraser to remove any visible ink. The Magic Erasers are a fabulous product so if you have never tried them – you must test them out for yourself!
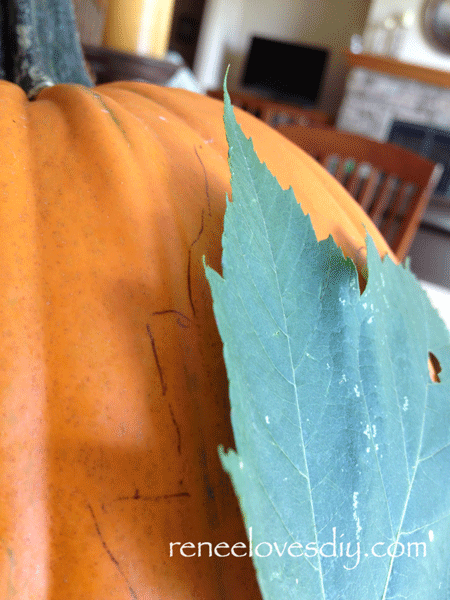
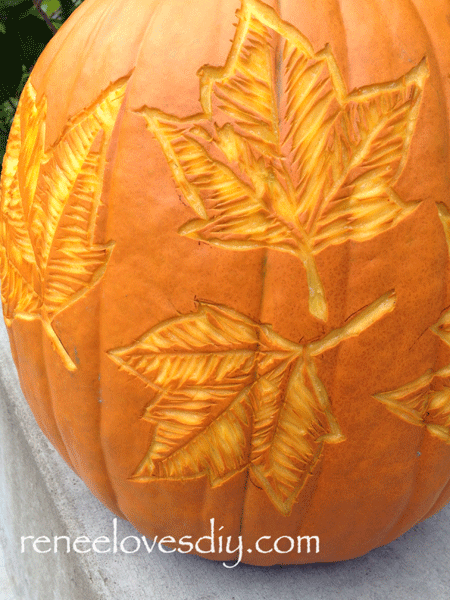
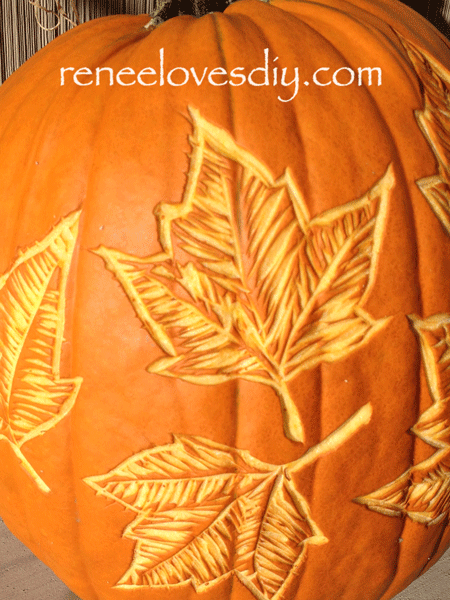
My next pumpkin I etched with maple leaves. I went to my backyard, picked a couple of different sized leaves and roughly traced them onto my pumpkin.
Preparing Pumpkin for Leaf Etching
I etched out the edge of the leaves then added the veining detail. If you are not sure how to add the veining, just examine the leaf in front of you. Of course, I had to simplify the detail – I am not as good as mother nature!
Pumpkin with Leaf Etching
If you are unsure how to lay out a vine or leaves to make them look natural, just google drawings of the images you want to replicate and you will get wonderful guidance from the many fabulous artist whose images are on the web!
Pumpkin with Vine EtchingPumpkin with Leaf Etching