Monthly Archives: January 2015

Mini-Chocolate Cakes Filled with Almond Paste!


Mini-Chocolate Cakes filled with Almond Paste!

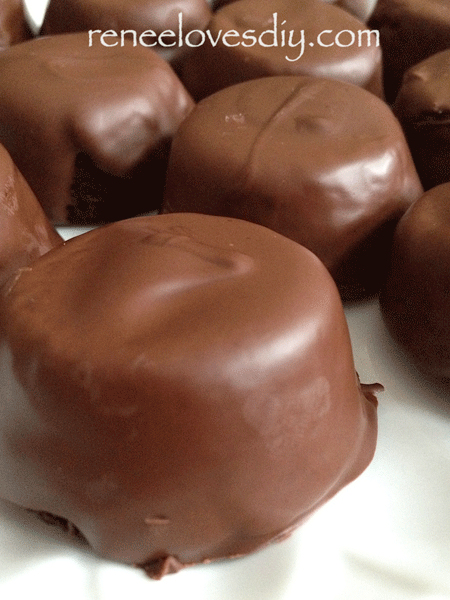
Just in time for Valentine’s Day, these Mini-Chocolate Cakes filled with Almond Paste are delightful!  I prepared them by baking cake batter in a mini-muffin tin  along with almond paste and then covering them in a luscious layer of chocolate!

Your Valentines would love to receive these as their Valentine’s Day treat!

Mini-Chocolate Cakes Filled with Almond Paste

3/4 cup flour
1/2 cup cocoa powder
1/4 tsp baking soda
Dash salt
1/2 cup butter
3/4 cup sugar
1 egg
1/2 tsp vanilla
1/3 cup hot water
8 oz Almond Paste sliced into 1 tsp pieces

Preheat oven to 350 degrees and prepare mini-muffin tins by spraying with cooking spray. This recipe will make 30-36 mini-cakes!

Mini-Chocolate Cakes filled with Almond Paste!
Dry ingredients

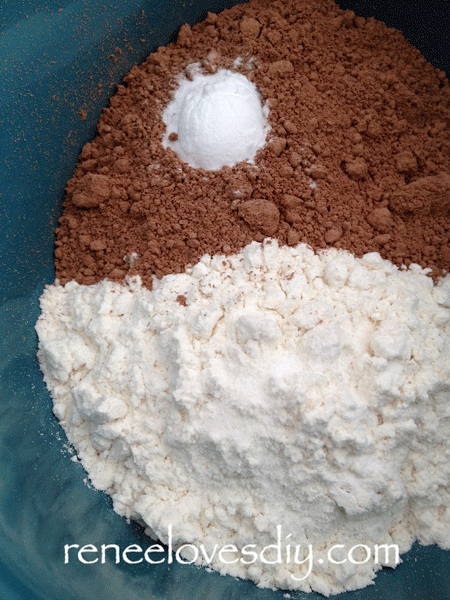
Step One – Sift together dry ingredients

Mini-Chocolate Cakes filled with Almond Paste!

Step Two – Beat the butter, sugar, and vanilla  in a medium bowl  until fluffy.

Step Three – Add 1/2 of the dry ingredients to the butter mixture and beat until just combined.  Slowly add the hot water  to the batter and beat until mixed well.  Add the rest of the dry ingredients to the batter and mix until just combined.

Mini-Chocolate Cakes filled with Almond Paste!


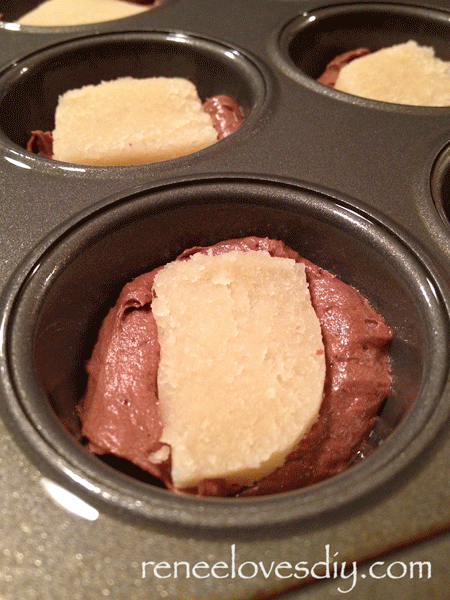
Place 1/2 tablespoon or so of batter into each mini-muffin  well.  The goal is to have enough batter to cover the bottom on the muffin well.  Into the batter,  press 1 tsp of Almond Paste!

If you have never used Almond Paste before, it is wonderfully tasty stuff!  You can find it in the baking aisle of your grocery store.  It is sold in tubes and cans and is very easy to work with. For this recipe, slice the almond paste into 1 teaspoon pieces that will fit on top of the batter in the muffin tin!

You will most likely have a little extra Almond Paste left over after preparing this recipe.  I recommend eating it quickly before the kids see it!  It is that good!

Mini-Chocolate Cakes filled with Almond Paste!

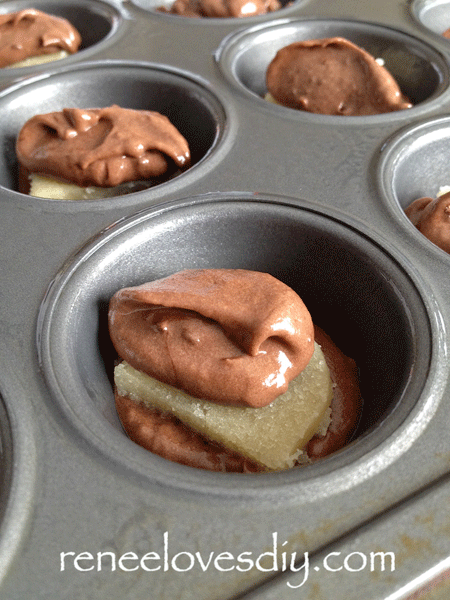
Top the almond paste with 1 tsp of batter.  Don’t worry if it doesn’t spread out evenly, it will in the oven!

Bake for 9-12 minutes in a 350 degree oven.  Do not over bake!

Mini-Chocolate Cakes filled with Almond Paste!

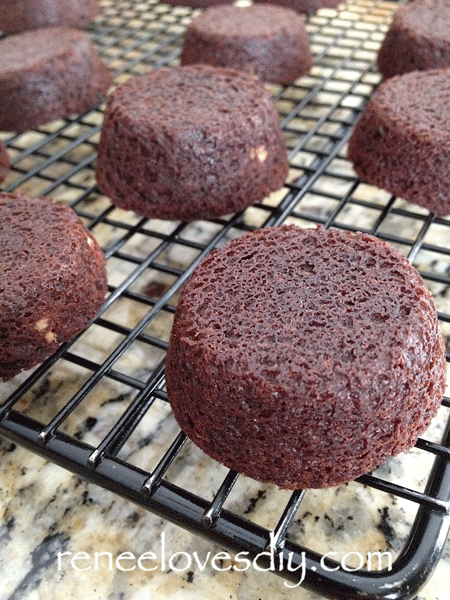
After the mini-cakes have cooled in the pan for at least 5 minutes, carefully remove and allow to cool upside down!

Mini-Chocolate Cakes filled with Almond Paste!

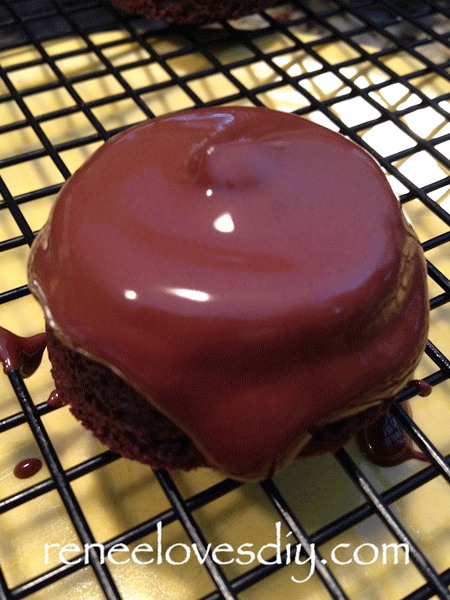
After the mini-cakes have completely cooled.  Drench in your favorite dipping chocolate!

Mini-Chocolate Cakes filled with Almond Paste!

Allow to cool & enjoy!

Here is a printable recipe!

[gmc_recipe 2158]

Mini-Chocolate Cakes filled with Almond Paste!
I linked up to iheartnaptime!

Wishes for the New Year!

candle13

Need a simple, yet personal gift for the New Year!  Well, I have one for you!  Gather your candles to create our New Year’s Wish Candle!

Recently, my daughter and I were visiting friends and we wanted to present them with a gift for the new year!  We decided on labeling a candle with a wish for each member of the family with the idea that burning the candle then makes the wishes come true!

The wishes for this favorite family ranged from good luck on a college search to may you have many wonderful bottles of wine.  Yes – those wishes were for different members of the family!

What do you need?
Candles
Paint Marker
Tape – to keep things straight!

Candle of Wishes for the New Year!

Any candle will work for this project!

If you need a guide to keep things straight,  apply tape before writing on the candles! Electrical tape works well because it is narrow and can be stretched!  Also, it is sticky, but not too sticky.

candle4

I purchased a metallic Sharpie brand paint pen.  The Oil formula worked very well on the candles.  Occasionally, I found it necessary to write on plain paper to remove any wax that accumulated on the tip of the marker!

candle2

Here is the candle we made for our friends with their personalized wishes.  The candle was originally in a jar, but it was easily removed by freezing the candle.  As the candle freezes, it shrinks and will simply pop out of its jar.  After we had written on the candle, we returned it to its jar, wrapped it in beautiful tissue paper and we had a wonderful New Year’s gift!

Now go make one of your own!

candle11


Wine Bottle Gift Bag

bag17

If you enjoy a wonderful glass of wine then you are probably like me and delight in giving your favorite bottles as gifts!  Since we all like our gifts to be beautifully wrapped,  what better way to present a bottle of wine than to wrap it in a lovely wine bag!  This post also includes free printable wine gift tags!

Wine bottle gift bags are incredibly easy to make and for those of you who claim to be “non-sewers” this is the perfect project for you to begin your sewing adventure!

What do you need!

1 yard of a medium weight woven fabric – Decorator fabrics are my fabric of choice!
One yard will make 5 wine bags!

Courage!  Yes – You can do this!

Here is a how-to video for making wine bags! This is the easiest way to learn how to create this fun  and easy project!


Step One – Lay out your 1 yard of fabric and cut 8.5″ strips lengthwise.  If your fabric is at least 44″ wide, you will be able to cut 5 strips of fabric that are 8.5″ wide and 36″ long from one yard of fabric.

wine1

Step Two – Taking one of your strips of fabric, fold it in half with the right sides together.

In sewing terms :  Right side = printed side.

Pin along the long edges and mark the bottom fold with a pin.

bag4

Now we are going to create a pleat at the bottom fold to create a nice “boxed” bottom to our bag.

Step Three – Using your bottom fold pin as a marker, measure 1.5″ and create a new bottom fold. Remove the pin that originally marked the bottom and replace it in the same spot catching both layers of fabric.  Do this on both sides of the bottom fold.

bag5

Now you will notice extra fabric on your top layer, just flatten this out and you will see how easily the pleat is formed at the bottom fold.  Remove the bottom fold pin again and re-pin it so it now goes through all 4 layers of fabric.

bag6

On the other side, do the same thing – Remove the bottom fold pin and re-pin it so it goes through all 4 layers of fabric.

bag7

Step Four – You are now ready to sew your bag!  Stitch 5/8″ seam on each of the long ends making sure to use a few back stitches at the start and end of your seams so your stitching will not unravel.  At the top opening, finish the fabric edge with a zig-zag stitch to prevent it from fraying.

I am fortunate enough to have a serger therefore, I used that to sew my seams and finish the top edge of my bag.  This is not necessary!

bag8

Time to create a hem at the bag opening.

Step Five – Fold the top opening of your bag over 2.5″ and pin it in place.  Stitch the fold in place using a straight stitch 3/8″ from the edge.

gab3

Turn your bag right side out and Voila! – A Beautiful Wine Bag!

bag3

I do iron the bottom box pleat on the bags.  It is not necessary, but it does finish it off nicely!

bag15

Now go take an adventure to your local fabric store and find a beautiful fabric to create these wonderful bags!  Don’t forget the ribbon to tie your bag with!

A ribbon with a bow will require 42″ of ribbon and a ribbon with just a knot needs only 24″.

For additional fun, include an adorable wine tag with your gift – they are free!
Click here to print –  Wine Tags!WineTags3

bag10