Monthly Archives: November 2014

An Advent Calendar that is Adorable and Easy!

Everyone loves an advent calendar to help count down the days before Christmas!  Last year, in the last days of November, my 17 year old son said to me, “you are putting up the advent calendar, aren’t you?”  I was actually considering not doing it, he was getting pretty old for such a thing.  Next thing I know,  my 20 year old daughter is asking me if I was planning on sending an advent calendar to her college apartment!

What did I tell you?  Everyone loves an advent calendar!

Here is a link for Advent Calendars for the College Student!

Here is a video presentation!

Years ago, when my children were tiny, I began this tradition.  The socks I hung were all sewn together from fabrics that I had used on projects for the kids.  The fabrics ranged from curtain fabrics and costume materials  to pajama flannel.  Some of the stockings had pointy toes, round toes, but my proudest was the cowboy boot from fake leather – so cool!

So – if you are a seamstress.  Going this route would be very special for your kids!  Pull out all your fabric scraps and get sewing.

If you are not a seamstress – no worries.  Here is an idea that is cute, inexpensive and easy!  Does anything get better than that?

What do you need?

Socks!

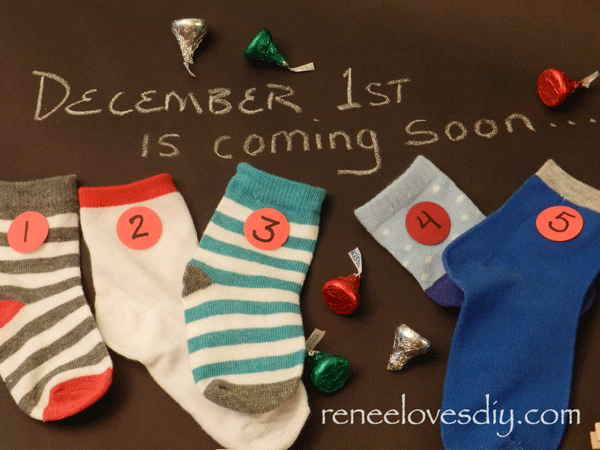
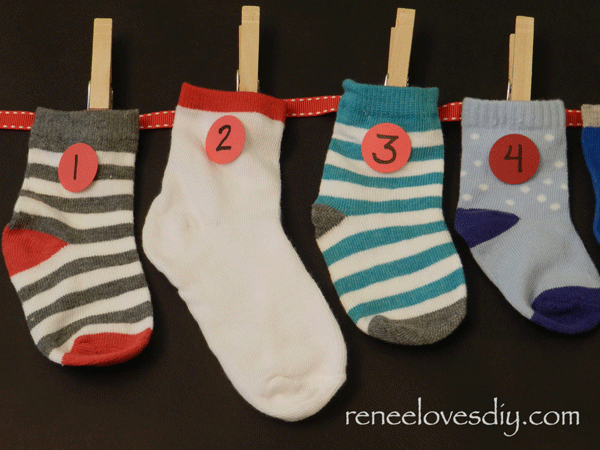
I used tiny socks because they are so darn cute!  The sizes ranged from 3 months to 2 years!  Pick an assortment of colors, stripes, whatever you can find!

advent7

 Ribbon

Clothes Pins

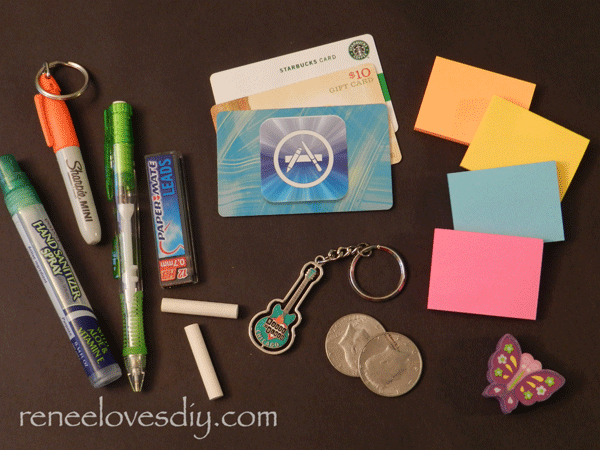
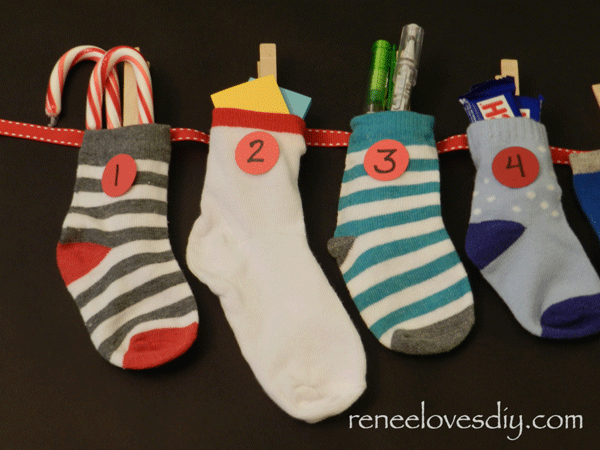
Good Stuff to fill the socks with!

advent11

Along with candy, I like to add things like sticky notes, hand sanitizer, markers, and  automatic pencils with accessories.  In one sock they may get the pencil; the next day they receive the lead that goes with the pencil and then the eraser…

Other ideas:  small toys, nail polish, money, lip balm, hair clips, a harmonica, fun paper clips…

Years ago, I put together an advent calendar for a beloved & wonderful niece ( She reads my blog!)  The first year, I sent the socks fully stuffed with goodies so it was ready to hang up on the first day of advent.  Each year after that, I would just send the stuffing and her mother crammed it in the socks for me.  Because the advent calendar was also her Christmas gift, she had a 25th day and into that stocking she would find her Christmas gift – usually a gift card!

Just one more idea for those of you with a beloved and wonderful niece, nephew, blogger…

advent12

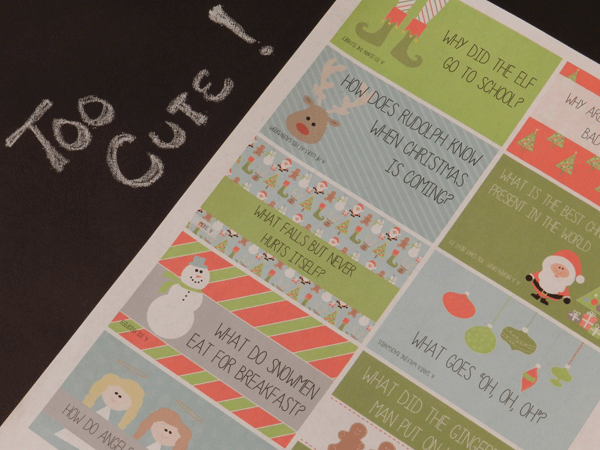
The final items to include in the advent stockings are jokes and riddles.  Sometimes I will give the riddle one day and the answer the next.  You will find tons of them on the web, but this year I found something special!

These are lunch box jokes from a fellow blogger and these are perfect for an advent calendar!  Here is the link to so you can print up some of your very own – Christmas Jokes!

advent13

Now that you have gathered your supplies, the rest is easy.

The socks will need to be numbered from 1 to 24.  I punched out circles of card stock, numbered them and hot glued them to the socks.  Let me tell you, those numbers aren’t going anywhere!

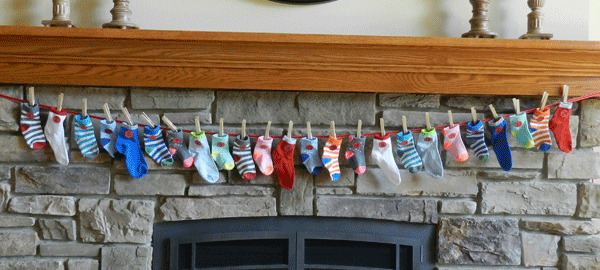
Using clothes pins, hang the stockings on a ribbon, leaving plenty of ribbon on either end for tying up the calendar!

advent10

Now for the fun part – filling the stockings!

advent9

You better get on this soon!

advent8

I linked up to iheartnaptime!

Hot Chocolate Bar


Hot Chocolate Bar
Hot Chocolate Bar

As adults, we plan fabulous parties thinking of everything an adult might enjoy.  We tend to overlook the fact that kids will be present at our gathering and may not enjoy the same things! This year, when planning your holiday party, create a special treat just for the kids!

So kids – this is for you!

Candy for a Hot Chocolate Bar

Hot Chocolate Bar

Set up an area where the kids can choose treats to stir into their mugs of hot chocolate. Bowls heaping with cut-up peanut butter cups, peppermint patties and marshmallows will be a welcome sight for the wee ones. Include candy canes and chocolate spoons for stirring their personalized drink!
And don’t  forget the whipped cream – Must have whipped cream!

Cinnamon – that’s another great addition.  Sprinkle some of that on the whipped cream – so beautiful!

Hot Chocolate Bar
Hot Chocolate Bar

Just in case there is an adult or two that enjoys a nice mug of hot chocolate, have a few mini-bottles of assorted liquors for them to add to their mugs! There we go – thinking about the adults again!

Liquor Bottles for the Hot Chocolate Bar

How to make Chocolate Spoons!

This recipe will make 8 Chocolate Spoons
Heat 1/2 cup semi-sweet chocolate chips and 1/2 tsp  coconut oil in a double boiler over barely simmering water.  Allow the chips to melt and then stir until smooth.

Chocolate Spoons
Chocolate Spoons

Using plastic or wooden spoons ( I couldn’t find them, but I know they exist!)
Coat them well and make sure the bowl of the spoon is full of chocolate!
Set on wax paper to cool

Chocolate Spoons
Chocolate Spoons

Heat 2 oz of cut-up caramels and 1/2 tbs of cream in a double boiler over barely simmering water.
Allow the caramels to soften then stir until smooth.  Drizzle the melted caramel over the top of the chocolate spoons.  If the caramel isn’t drizzling well, thin with a little water!

Chocolate Spoons Drizzled with Caramel

The caramel sticks to everything therefore, I would avoid getting it on the bottom of the spoon!  The kids won’t be able to pick them up!

Also, I use a small glass bowl over a small pot of simmering water.  A regular double boiler is way to big for this tiny amount of caramel!

I linked up to iheartnaptime!

Flourless Mocha Brownie

Flourless Mocha Brownie

Who wants a delicious brownie with none of the flour and all of the delicious taste?  I do!
This recipe is one of my go-to desserts when having a party.

I like to cut these brownies into bite-sized pieces and top them with a chocolate covered espresso bean!  Guests seem to like desserts that are small – why? I think it’s so they can eat 5 of them and not feel guilty – hmmm.

Here is the recipe for you to try!

Flourless Mocha Brownie
½ cup unsalted butter
1 cup semi-sweet chocolate chips
½ cup sugar
1 tsp vanilla
3 eggs
dash salt
½ cup cocoa powder
2 tsp Espresso Powder

Genache Icing
2/3 cup cream
1 cup chocolate chips

Chocolate Covered Espresso Beans

Heat your oven to 350 degrees and prepare a 9” square pan by spraying generously with cooking spray. In a double boiler, melt the butter and 1 cup of chocolate chips over barely simmering water. Whisk until smooth.

Melt Butter and Chocolate Chips in a double boiler!
Chocolate Mixture for Flourless Mocha Brownies!

Remove the top of your double boiler from the heat and stir in the sugar, vanilla and eggs. Mix well. Sift together the cocoa powder, espresso powder and salt and add this to the egg mixture. Stir until just combined and pour into your prepared pan.

Flourless Mocha Brownie is ready for baking!

Bake for 12-15 minutes until a cake taster comes out almost clean.

Flourless Mocha Brownie ready for it's Genache glaze!
Flourless Mocha Brownie ready for it’s Genache glaze!

Allow the brownie to cool in the pan for 10 minutes then turn over onto a cutting board. Allow the brownie to cool completely. In a double boiler melt the chocolate chips with the cream over barely simmering water.

Prepare Chocolate Genache with Cream and Chocolate Chips!

Whisk until smooth. Remove from the heat and allow to cool slightly before spreading over the brownie layer.

Drizzling Genach over the Flourless Mocha Brownie!

After the genache has stiffened, cut the brownies into bite-sized pieces. Top each brownie square with a chocolate covered espresso bean.  Enjoy!

Flourless Mocha Brownie

If you clean your knife after every cut, you will get perfect pieces with no crumbs!

Flourless Mocha Brownie

Here is an easily printable recipe for you![gmc_recipe 1725]


I linked up to iheartnaptime!

Lighted Christmas Balls


Balls wrapped in Christmas lights creates a beautiful outdoor Christmas scene!
Balls wrapped in Christmas lights!

I love Christmas and I love getting outside and putting up the Christmas lights – provided it’s not below zero!  I don’t go Griswold crazy, but the lights go up every year!

Last year, I discovered a very cool picture of a park where large lighted balls were placed in an open snow-covered area.  The look was magnificent.  Each ball was large – I would guess 3-4 feet around and wrapped in a single color of christmas lights.  The balls were haphazardly placed around a lighted christmas tree and the look was stunning and something I knew I had to try!

There was one problem with this project, to effectively cover balls that large would require many more lights than I was willing to purchase.  Solution – use smaller balls!  My yard isn’t that big anyway, but having 4 foot balls scattered though out my yard would be very cool!  Maybe next year!

Balls wrapped in Christmas lights creates a beautiful outdoor Christmas scene!

First things first – where to get the balls to wrap?  Last year when I tried this, I used grape vine balls!  Grape vine balls are wonderfully decorative during the day because they are natural looking and look awesome laying about a dormant flower bed.  The problem with grape vine balls is  that they can easily be crushed under a foot or more of snow – it happens!

This year I have been purchasing metal garden spheres.  These are much sturdier and I have used them in lots of decorating projects – I love multi-functional objects!

Balls wrapped in Christmas lights creates a beautiful outdoor Christmas scene!

On each sphere, I simply wrapped a single color of christmas lights and you can see the lovely look it provides.  This effect is especially nice when it contrasts with white lights in the rest of your Christmas lighting.

How many lights did I use?  The small ball has 210 lights and the large balls have 300 lights!

One more tip – wind will move the balls so anchor them!  I use a tent anchor, but anchors for landscape edging would work well too!

We finally received some snow!

Balls wrapped in Christmas lights creates a beautiful outdoor Christmas scene!

And more snow…

Snow Covered Lighted Christmas Balls

Happy Holidays!


Magical Outdoor Christmas Lights

Mixed Christmas lights makes for a beautiful tree!

Once upon a time, when I lived in Iowa, I spotted the most fabulously decorated tree along a downtown street.  It was a deciduous tree decked out in colored christmas lights and every time I passed it I couldn’t stop looking at it.  It was magical.  There was something about it that made it stand out from all the others.

Finally, after closely inspecting the tree, I figured out what it was that made the tree’s look so special.  The colored lights hanging on the tree were of two types – mini lights and large solid bulbs.  The combination of lights created such a cool look that I had to replicate the effect!

Mixed Christmas lights makes for a beautiful tree!

The key to creating this look is to make your two types of lights as different as possible, while keeping the colors the same.  I used mini colored lights and large colored lights.

LED C7 Christmas Lights

Large Christmas light bulbs come in multiple sizes.  I would suggest using size C9 – if you can.  Mine are C7, but I wish they were C9.  In case you haven’t already guessed it, all that C-talk is the bulb size!  C7 means it’s a 7 watt bulb, C9 is a  9 watt bulb!

Also, I would suggest using the  solid colored bulbs because the large clear bulbs look too much like the mini lights – so go solid!

Mini-Christmas LED Lights

Now the question – LED or traditional lights.  LED mini-lights are very bright and what I choose to use.  When it comes to the larger C7 or C9 bulbs, the traditional lights are brighter than the LEDs, but the brightness also dilutes the color of the bulb.  I prefer to use the large LED lights because the color is greater and the electricity use is so much less.  The picture below shows all LED lights both minis and C7s!

Mixed Christmas lights makes for a beautiful tree!
Mixed LED Christmas Lights!

There is one more benefit to this mixed up Christmas light look!  The large bulbs are clearly visible in the daylight hours, giving a nice look to your tree 24/7!

Christmas Tree Lights in Snow!
Mixed Christmas lights makes for a beautiful tree!

Happy Holidays!